Installing a custom subwoofer bed is the only way to achieve competition-grade SPL while maintaining a professional, integrated look in your vehicle. This specialized enclosure system houses multiple high-excursion drivers within the rear cargo area, utilizing reinforced structures tuned to specific port frequencies between 28Hz and 35Hz for maximum low-end impact. A properly built subwoofer bed allows for massive surface area coverage that standard boxes can't match, transforming the vehicle into an acoustic chamber capable of handling over 2,500 watts of RMS power. This setup requires heavy-duty bracing and high-quality sound deadening to eliminate the rattling and vibration issues common in high-output systems.
Most car audio enthusiasts settle for mediocre bass because they fear the technical complexity of a massive custom installation. You know that a basic boxed sub just won't move enough air to create the chest-thumping physical impact you crave. This guide provides the technical blueprint to integrate high-output drivers into an enclosure that hits with clinical precision. We'll break down the essential gear for 2026, wiring configurations for multi-sub setups, and the fabrication techniques used by the UK's top audio specialists.
Key Takeaways
- Understand how a custom subwoofer bed leverages massive internal air volume to achieve lower frequency responses that standard prefab boxes cannot reach.
- Identify the essential carpentry and acoustic requirements for building rigid, air-tight enclosures that prevent energy loss and structural failure.
- Determine the correct amplifier headroom and power requirements needed to safely drive multiple high-RMS drivers in a large-scale integration.
- Learn professional methods for securing heavy enclosures to the vehicle chassis and using distortion detectors for precision system tuning.
What is a Subwoofer Bed and Why Build One?
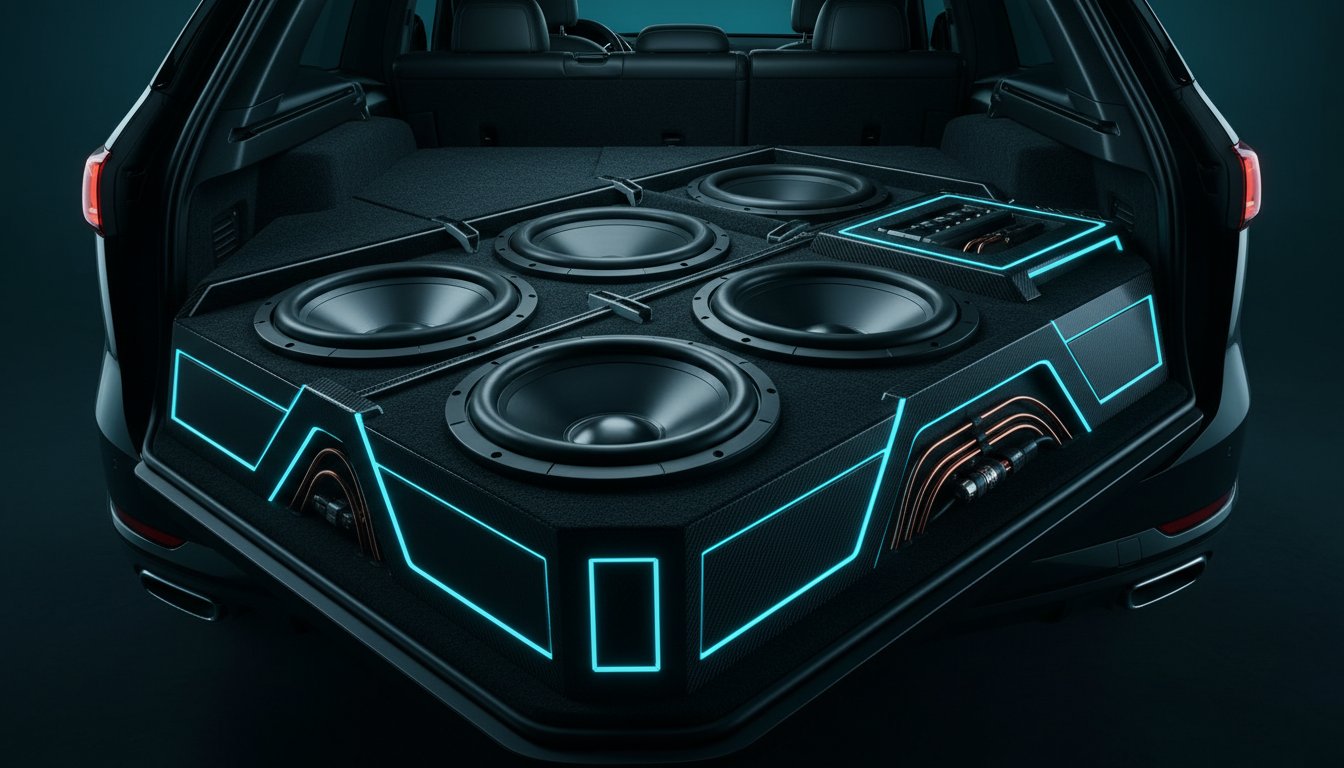
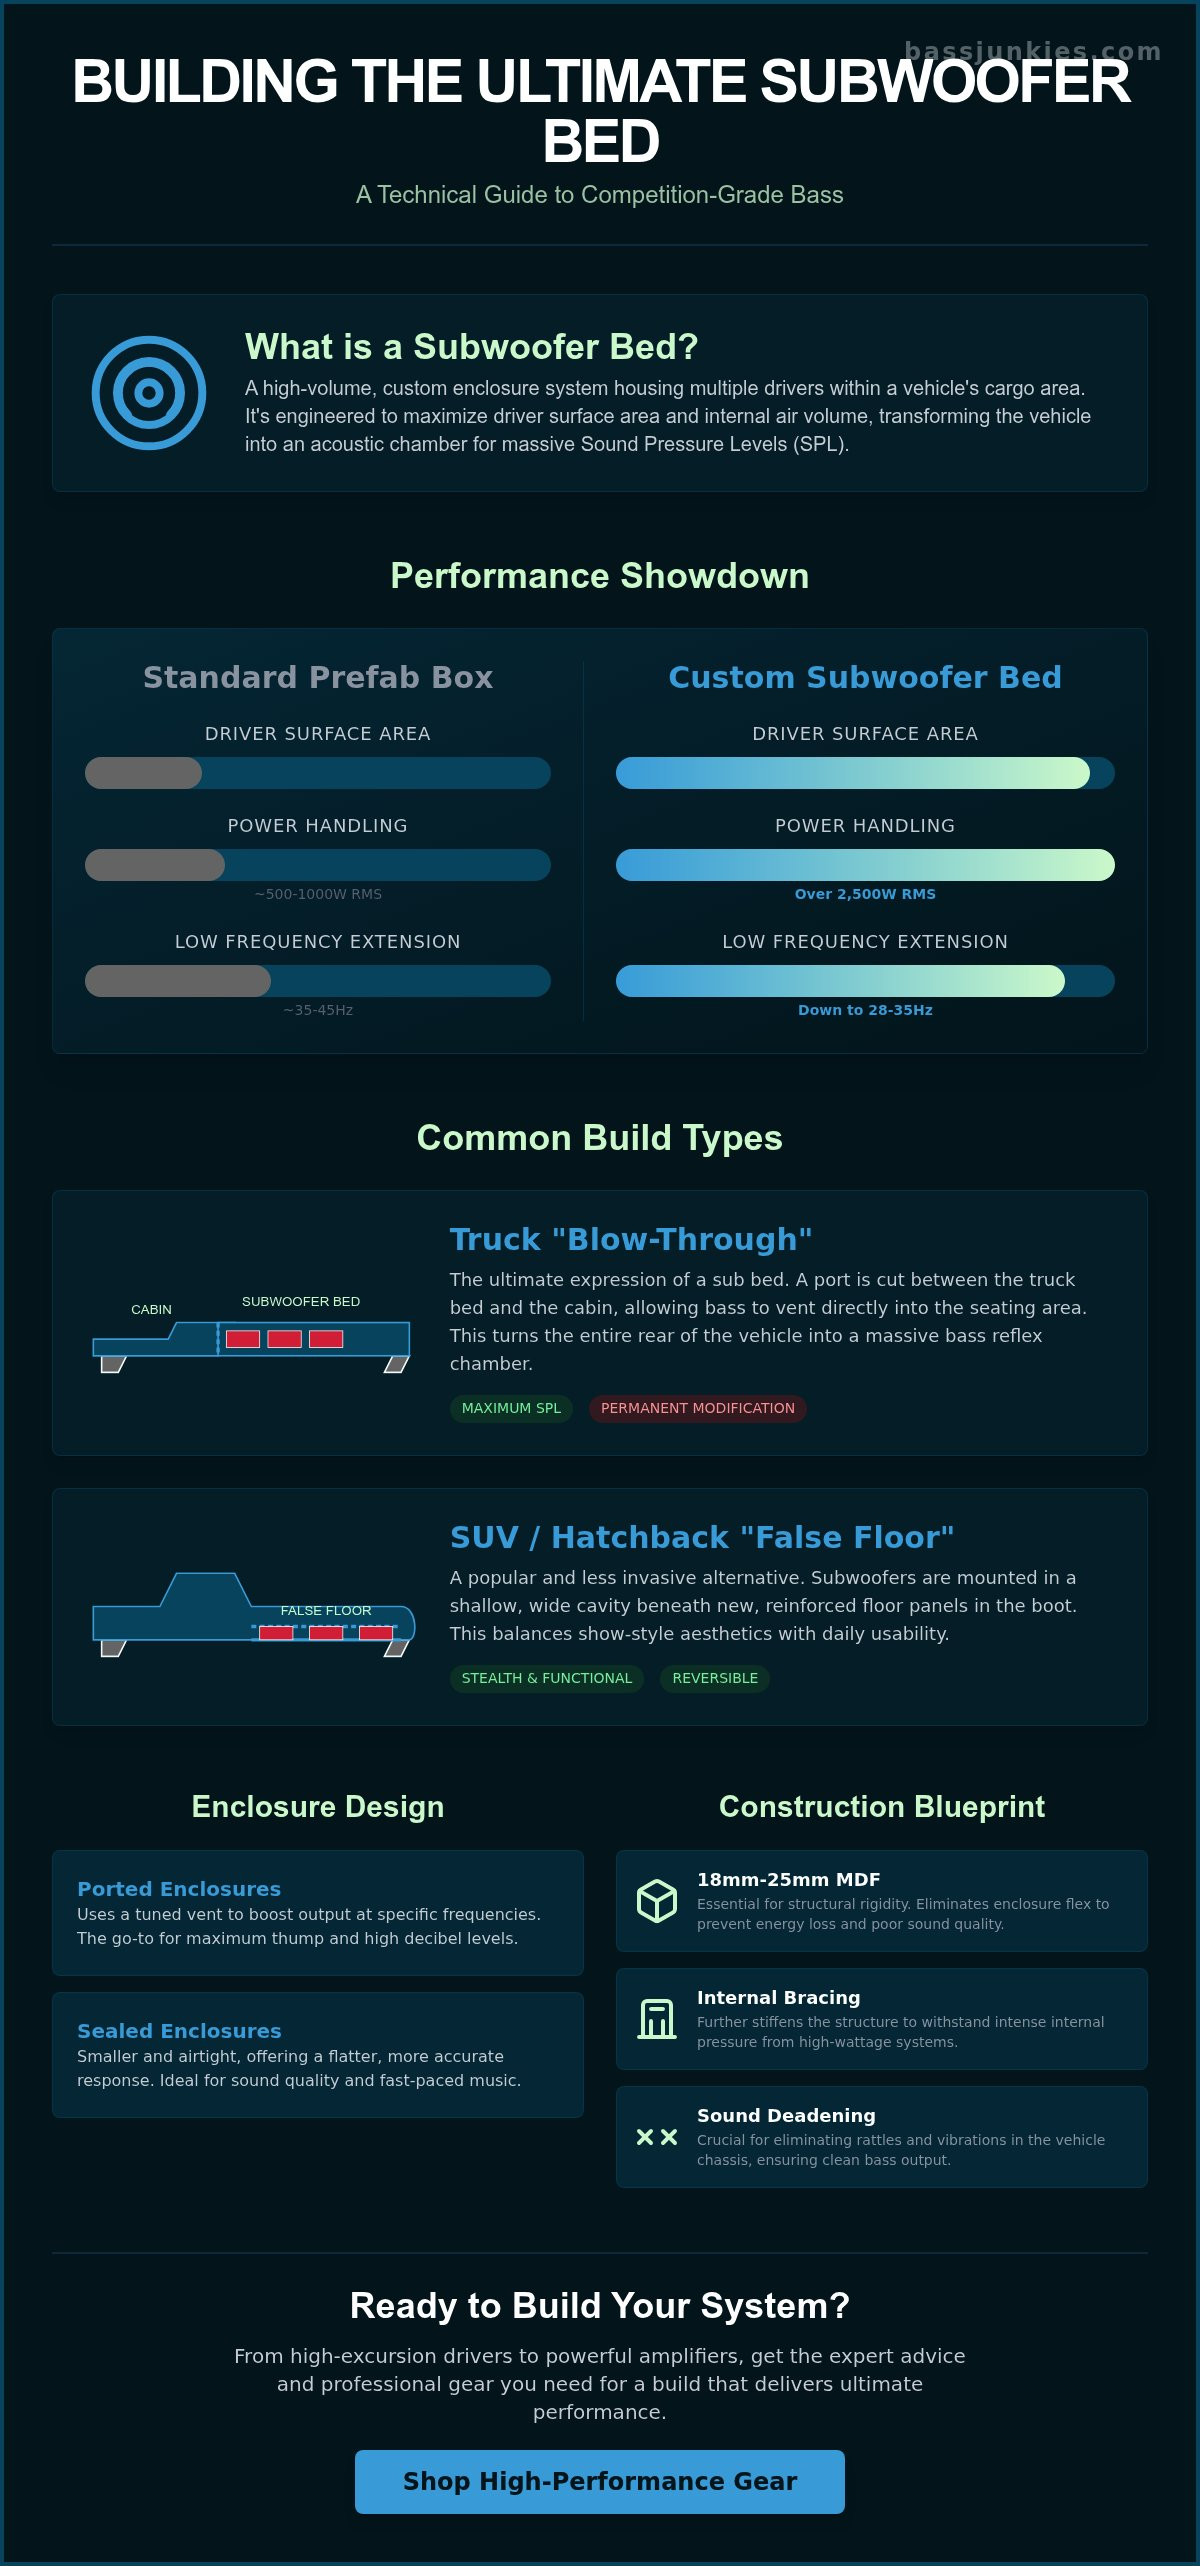
A subwoofer bed is a high-volume custom enclosure designed to house multiple low-frequency drivers within a flat, platform-style structure. In car audio, this typically refers to a "blow-through" pickup bed build or a reinforced false-floor setup in a hatchback or SUV. These builds prioritise massive Sound Pressure Levels (SPL) by maximising internal air volume and driver surface area. Enthusiasts use these configurations to achieve extreme bass output that standard enclosures cannot provide. Every subwoofer bed aims to turn a large footprint into a functional acoustic chamber for maximum impact.
The primary engineering goal of a subwoofer bed is to increase the total displacement of the system. By using the entire width and length of a vehicle's boot or loading area, installers can fit four, six, or even eight large-diameter drivers. This setup allows for a significantly higher volume of air movement compared to a traditional box. Achieving these levels of performance requires a deep understanding of The Mechanics of High-Output Enclosure Design, as the enclosure must be rigid enough to withstand intense internal pressure without flexing.
The Viral DIY Home Trend
Social media platforms have recently popularised the concept of building subwoofers directly into bedroom furniture. These DIY projects often combine large 12-inch or 15-inch drivers with tactile transducers, also known as bass shakers, bolted to the bed frame. This creates a "4D" cinema experience where the user feels the vibration during gaming or movie scenes. While these home builds focus on haptic feedback, they differ from the high-octane vehicle integrations we specialise in at Bass Junkies. Our focus remains on road-ready systems that deliver crystal-clear, thumping audio at high speeds.
Truck Bed and Trunk Floor Beds
In the UK custom scene, a "blow-through" is the ultimate expression of a subwoofer bed. This involves cutting a port through the front of a pickup truck bed and the rear of the cabin, allowing the bass to vent directly into the seating area. It's a hardcore modification that turns the entire rear of the vehicle into a massive bass reflex chamber. For those who don't want to cut their chassis, a false-floor "bed" is the preferred alternative. These setups use high-performance subwoofers mounted in a shallow but wide cavity beneath a new floor panels.
Modern builds in 2026 often balance stealth with show-style aesthetics. A well-executed false-floor bed can hide several 10-inch drivers and a powerful 4-channel amplifier while keeping the boot functional for daily use. If you want to move from a weak factory setup to a high-performance solution, building a custom bed is the most efficient way to use your vehicle's available space. Our team provides the expert advice and technical gear needed to ensure your build delivers the massive savings and ultimate performance Bass Junkies is known for across the UK.
The Mechanics of High-Output Enclosure Design
Designing a high-output subwoofer bed requires balancing internal air volume with absolute structural integrity. Air volume is the primary factor determining how deep your subwoofers play, as larger enclosures allow for lower resonant frequencies and increased efficiency. Custom builds provide the massive internal space that standard prefab boxes simply cannot achieve. To handle the extreme pressure of high-SPL setups, you must use 18mm or 25mm MDF to eliminate enclosure flex. Ported designs offer maximum thump for those chasing high decibel levels, while sealed boxes provide tight, accurate bass for sound quality enthusiasts.
Structural rigidity is non-negotiable in a custom subwoofer bed. When you are pushing thousands of watts, the internal pressure can cause thin walls to vibrate, which kills your output and ruins sound quality. Using 25mm MDF for the baffle and 18mm for the walls ensures the energy stays focused on moving air rather than the wood. Adding internal bracing is a smart move to further stiffen the structure. This level of build quality is what separates a professional install from a basic DIY project.
Choosing between enclosure types depends on your listening goals. Ported enclosures are the go-to for bass junkies who want to feel the vibration in their chest. They use a tuned vent to boost output at specific frequencies. Sealed enclosures are smaller and offer a flatter response, making them ideal for rock or fast-paced electronic music. If you are looking to start your build, you can view high-performance subwoofers to find the right driver for your enclosure type.
Calculating Internal Air Space
You must use Thiele/Small parameters to determine the ideal box volume for your specific drivers. These specs tell you how the woofer behaves in different environments. Remember that bigger is not always better. If the driver is not rated for a massive enclosure, you will lose cone control and risk mechanical failure. Net internal volume is the space remaining after driver displacement.
Tuning Frequencies and Port Design
Port length and diameter dictate the tuning of your custom bed. A longer port generally results in a lower tuning frequency, which is perfect for those deep, rolling basslines. However, you must manage the relationship between low-frequency extension and port noise, often called chuffing. Using flared ports is a proven way to achieve cleaner airflow and prevent turbulence in high-SPL builds. This ensures your bass remains crisp even at maximum volume.
DIY vs. Professional Custom Enclosure Builds
Building a high-performance subwoofer bed requires advanced carpentry skills and a technical understanding of acoustic pressure. Professional builds are superior because they are tuned to the specific resonant frequency of the vehicle cabin, ensuring maximum SPL without frequency "dead spots." DIY projects often fail due to air leaks, inadequate internal bracing, or incorrect wiring phases that can overheat voice coils and sap amplifier power. Bass Junkies provides the technical expertise and high-spec hardware to help enthusiasts bridge the gap between amateur attempts and competition-grade results.
A professional-grade subwoofer bed must be built to withstand extreme internal pressures that can exceed 150dB. Standard wood screws and basic glue aren't enough to keep the structure intact over time. Professionals use a combination of dado joints and industrial-strength adhesives to create a monolithic structure. If you choose the DIY route, you must account for the displacement of the subwoofers and the bracing itself when calculating your internal volume. Failing to do this results in a box that is tuned too high, leading to "muddy" bass that lacks the deep, low-end punch expected from a custom build.
Essential Tools for the Build
Precision is the foundation of any elite bass system. You need a table saw for perfectly square cuts and a router with a circle jig to ensure your drivers sit flush against the baffle. High-quality wood glue and silicone sealants are non-negotiable for maintaining an airtight environment. Applying sound deadening to the surrounding vehicle panels is a critical step to stop metal-on-metal rattle from ruining your audio quality. We always recommend using high-quality terminal cups from our accessories collection instead of drilling holes. Drilling holes for speaker wire creates permanent leak points that lead to port noise and reduced efficiency.
The Importance of Enclosure Bracing
Internal "window" braces are essential for structural integrity in a large subwoofer bed. These braces connect opposite walls to stop the enclosure panels from flexing outward during heavy bass tracks. If your enclosure walls vibrate, you lose energy that should be moving your cone, which directly reduces your overall SPL. This vibration also puts unnecessary physical stress on the driver, potentially shortening its lifespan. For high-pressure builds, reinforcing internal corners with fiberglass resin adds the necessary mass and strength to handle massive power loads. This ensures every watt from your amplifiers is converted into pure, thumping sound rather than wasted heat and panel flex.
- Professional tuning matches the enclosure to the vehicle's resonant frequency for maximum output.
- Airtight seals and terminal cups prevent port noise and efficiency loss.
- Internal window bracing stops panel flex and protects driver longevity.
- Sound deadening is required to eliminate external rattles in high-pressure builds.
Essential Gear for Your Custom Bass Project
Building a high-performance subwoofer bed requires a total electrical overhaul to ensure your system doesn't starve for power. You cannot run a massive multi-driver array on a standard factory head unit because these units lack the pre-amp voltage and signal processing needed for heavy bass. You must use high-quality car subwoofers paired with an external amplifier that provides 20% to 30% more RMS power than the drivers' combined rating. This extra headroom prevents clipping and ensures the signal remains clean at high volumes. Every component in this chain must be rated for high current to avoid damaging your vehicle’s sensitive electronics.
Selecting the Right Subwoofers
Height is the biggest obstacle in a custom subwoofer bed build. Standard drivers offer massive excursion but often require deep enclosures that eat up your cabin or boot space. If your bed frame is low-profile, shallow-mount drivers are the professional choice. These units deliver thumping performance in a fraction of the depth. Use dual voice coil (DVC) subs to give yourself maximum wiring flexibility. DVC setups allow you to wire multiple drivers into a 1-ohm or 2-ohm load, pulling every available watt from your amp. Check out our subwoofer buying guide for brand-specific recommendations for 2026.
Powering the Beast: Amps and Wiring
Class D monoblock amplifiers are the industry standard for bass because they are highly efficient and run cooler than traditional Class AB designs. Efficiency is critical when you are pushing thousands of watts through a custom enclosure. Don't choke your system with cheap Copper Clad Aluminium (CCA) wire. High-current systems require 0-gauge Oxygen-Free Copper (OFC) wiring to maintain a steady 14.4V flow. To ensure your audio remains balanced, integrate a dedicated 4-channel amplifier to drive your mids and highs. This prevents your vocals from being completely overwhelmed by the massive low-end pressure.
Do not overlook the "Big 3" upgrade to support the increased current draw. This modification involves replacing three factory cables with 0-gauge OFC: the alternator plus to battery plus, the battery negative to chassis, and the engine block to chassis. Without this, your lights will flicker and your alternator life will be cut short. As the UK’s No. 1 car audio specialist, we recommend this as a mandatory step for any system exceeding 1,000 watts RMS.
- OFC Wiring: Prevents voltage drops and heat build-up.
- DVC Subwoofers: Essential for matching impedance to your amp.
- Headroom: Always over-spec your amp to keep the signal crystal-clear.
- Electrical Support: The "Big 3" protects your vehicle's charging system.
Stop starving your system of the power it needs to perform. Browse our professional wiring kits and Big 3 accessories to bulletproof your build today.
Final Assembly and System Tuning
Completing a subwoofer bed requires rigid mounting and precise electronic calibration to deliver maximum SPL without destroying your hardware. Your enclosure must be bolted directly to the vehicle chassis using 10mm high-tensile bolts or heavy-duty steel L-brackets to prevent dangerous movement during hard braking. A custom enclosure for twin 12-inch or 15-inch drivers can easily exceed 50kg; if that weight shifts, it will tear through wiring and damage your vehicle's interior. Once the box is locked down, use an SMD DD-1 or a digital multimeter to set your amplifier gain levels to ensure you reach maximum unclipped power.
Setting the Low Pass Filter (LPF) is the next critical step for audio clarity. Adjust your LPF to approximately 80Hz with a 24dB slope to ensure your subwoofers only handle the deep frequencies they were designed for. This prevents the drivers from attempting to reproduce vocals, which causes muddy sound and unnecessary heat. Test the system using a 40Hz sine wave followed by a variety of high-bitrate tracks to identify cabinet rattles or phase cancellation issues. If the bass feels weak despite high excursion, verify that your positive and negative terminals are consistent across all drivers.
Wiring for Impedance
Wiring your subwoofers in parallel drops the total resistance to hit your amplifier's 1-ohm stable sweet spot, which is where you extract the most raw wattage. Wiring in series increases the load resistance, which helps keep smaller amplifiers within their safe thermal operating limits. You must never run an amplifier at an impedance lower than its factory rating, as this leads to immediate MOSFET failure and permanent board damage. Impedance rise occurs when the sub is in motion, naturally increasing the electrical resistance as the voice coil moves through the magnetic field.
The Finishing Touches
Give your subwoofer bed a professional look by wrapping the exterior in heavy-duty automotive-grade carpet that matches your vehicle's trim. For a more rugged, industrial aesthetic, apply a thick layer of textured bed liner spray to protect the wood from moisture and scuffs. You can also integrate high-output LED strips or 12mm acrylic windows to showcase the motor structures of your high-performance drivers. Ready to start? Browse our latest offers to grab the gear you need.
- Mounting: Use 10mm bolts to secure the box to the chassis.
- Gain Setting: Use a multimeter to match amp output to the sub's RMS rating.
- Crossover: Set LPF to 80Hz for clean, punchy response.
- Aesthetics: Finish with carpet or bed liner for a factory-spec appearance.
Dominate the Streets with Your Custom Bass Build
Constructing a high-output subwoofer bed requires more than just raw power; it demands precision engineering and the right materials. You now understand how to calculate internal air volume and the importance of using 18mm MDF or birch plywood to prevent enclosure flex. Balancing DIY assembly with professional tuning ensures your system delivers thumping, crystal-clear low ends without risking hardware failure.
Bass Junkies has been the UK’s No. 1 car audio specialist since 1995, providing the expert technical support needed for world-class installs. We stock the massive components required to turn your 2026 project into a reality. Whether you're chasing SPL trophies or just want the ultimate daily driver, our team helps you navigate impedance matching and amplifier efficiency to get every watt of performance from your gear.
Don't leave your sound quality to chance. Shop the UK’s largest range of high-performance subwoofers at Bassjunkies and secure the massive savings you deserve. Your journey to ground-shaking audio starts right here.
Frequently Asked Questions
What is the best wood for a subwoofer bed build?
18mm MDF or Birch Plywood are the industry standards for building a rock-solid subwoofer bed. MDF provides the high density needed to prevent cabinet resonance, while Birch Plywood offers superior strength and weight reduction for mobile installs. Avoid standard chipboard or thin ply, as these materials flex under pressure and ruin your low-end response. For 2026 custom builds, 18mm thickness remains the sweet spot for balancing structural integrity with internal volume.
Can I build a subwoofer into my actual bed at home?
You can definitely integrate subwoofers into a home bed frame using tactile transducers or custom-built enclosures. Tactile transducers, often called bass shakers, bolt directly to the frame to provide physical impact without needing massive volume levels. If you want audible bass, you'll need a sealed or ported enclosure designed to fit the specific clearance height under your bed slats. Ensure the frame is reinforced with steel brackets to prevent 50Hz vibrations from loosening your hardware.
Do I need a second battery for a high-power subwoofer bed?
You need a second AGM or Lithium battery if your system exceeds 1,500W RMS to prevent dangerous voltage drops. High-output subwoofer bed setups pull massive current that standard UK car batteries can't sustain during peak hits. Adding a secondary power cell near the amplifiers reduces resistance and keeps your voltage stable at 14.4V. Systems pushing over 2,500W RMS should also include a high-output alternator to keep both batteries topped up during long sessions.
How much air space does a 12-inch subwoofer need in a custom bed?
A standard 12-inch driver typically requires between 1.0 and 2.0 cubic feet of internal air space depending on the enclosure type. Sealed boxes sit on the smaller end at roughly 28 to 35 litres, while ported designs need 45 to 60 litres to breathe properly. Always check the manufacturer’s T/S parameters before cutting your timber. Getting the volume wrong by even 10% can lead to muddy sound or mechanical failure of the woofer.
What is a blow-through subwoofer setup in a truck?
A blow-through setup involves cutting a precise opening between the truck bed and the cabin to allow sound pressure to move freely. This allows you to house massive enclosures in the load area while the bass fires directly into the seating space. It requires a flexible, waterproof accordion boot to seal the gap between the cab and the bed. This modification is the ultimate way to get 150dB+ performance without sacrificing any interior legroom.
Will a custom subwoofer bed ruin my car’s resale value?
A permanent subwoofer bed can reduce resale value by 15% to 20% if the installation requires cutting metal or drilling into the chassis. Most UK buyers prefer factory-standard interiors, so a stealth build that's easily removable is the best way to protect your investment. If you perform a blow-through modification, expect the pool of potential buyers to shrink significantly. Keep your original panels and carpet so you can revert the vehicle to stock before selling.
How do I stop my custom enclosure from rattling against the floor?
Stop vibrations by applying a layer of 2mm butyl rubber sound deadening to the floor and securing the enclosure with steel L-brackets. Mechanical rattles happen when the box moves even a fraction of a millimetre against the metal van or truck floor. Use high-density foam strips between the box and any contact points to decouple the vibration. Bolting the enclosure directly to the vehicle's load-lashing points ensures it stays put during heavy cornering.
What is the difference between RMS and Peak power in custom builds?
RMS power represents the continuous wattage an amplifier can output safely, while Peak power is the absolute burst limit for a split second. You should always match your gear based on RMS ratings to avoid overheating your voice coils. A 1,000W Peak subwoofer might only handle 500W RMS, so ignore the Max Power stickers on cheap packaging. Focus on the 12V RMS rating to ensure your system delivers clean, undistorted bass all day long.