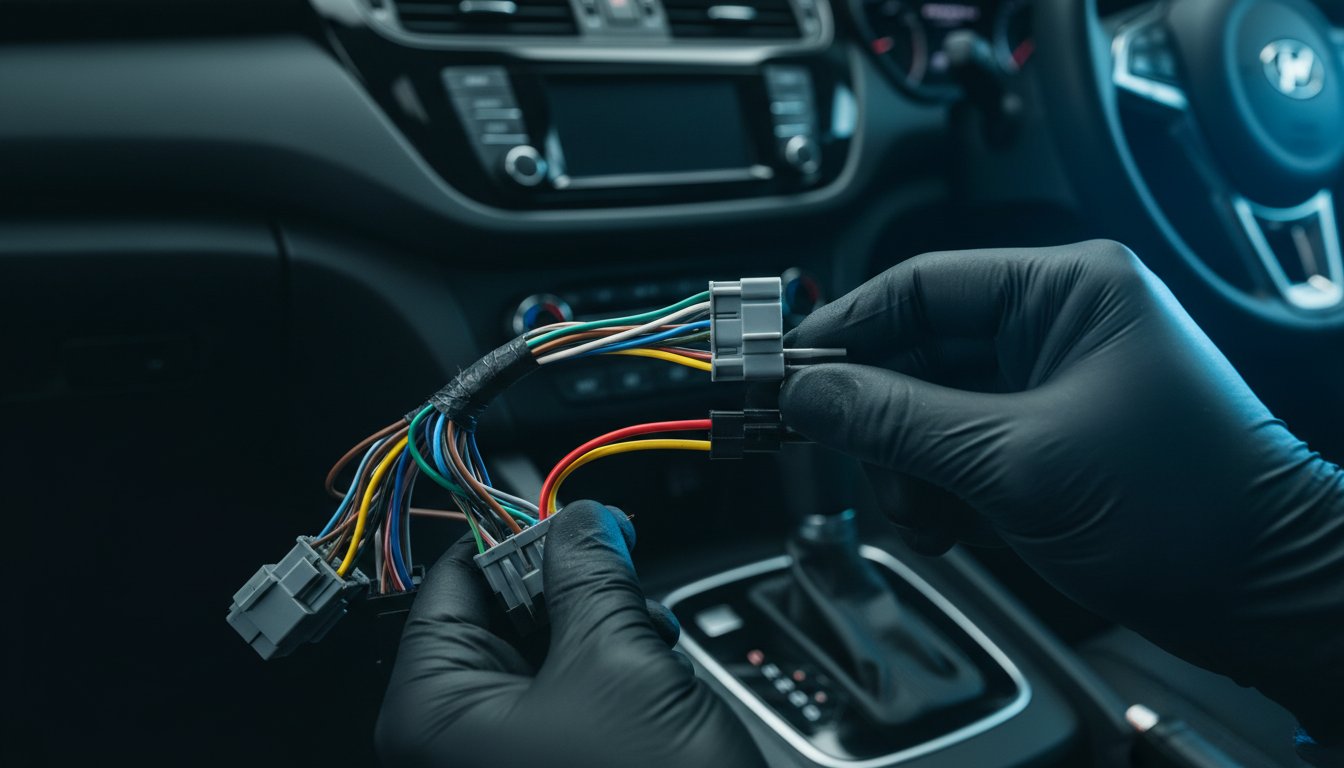
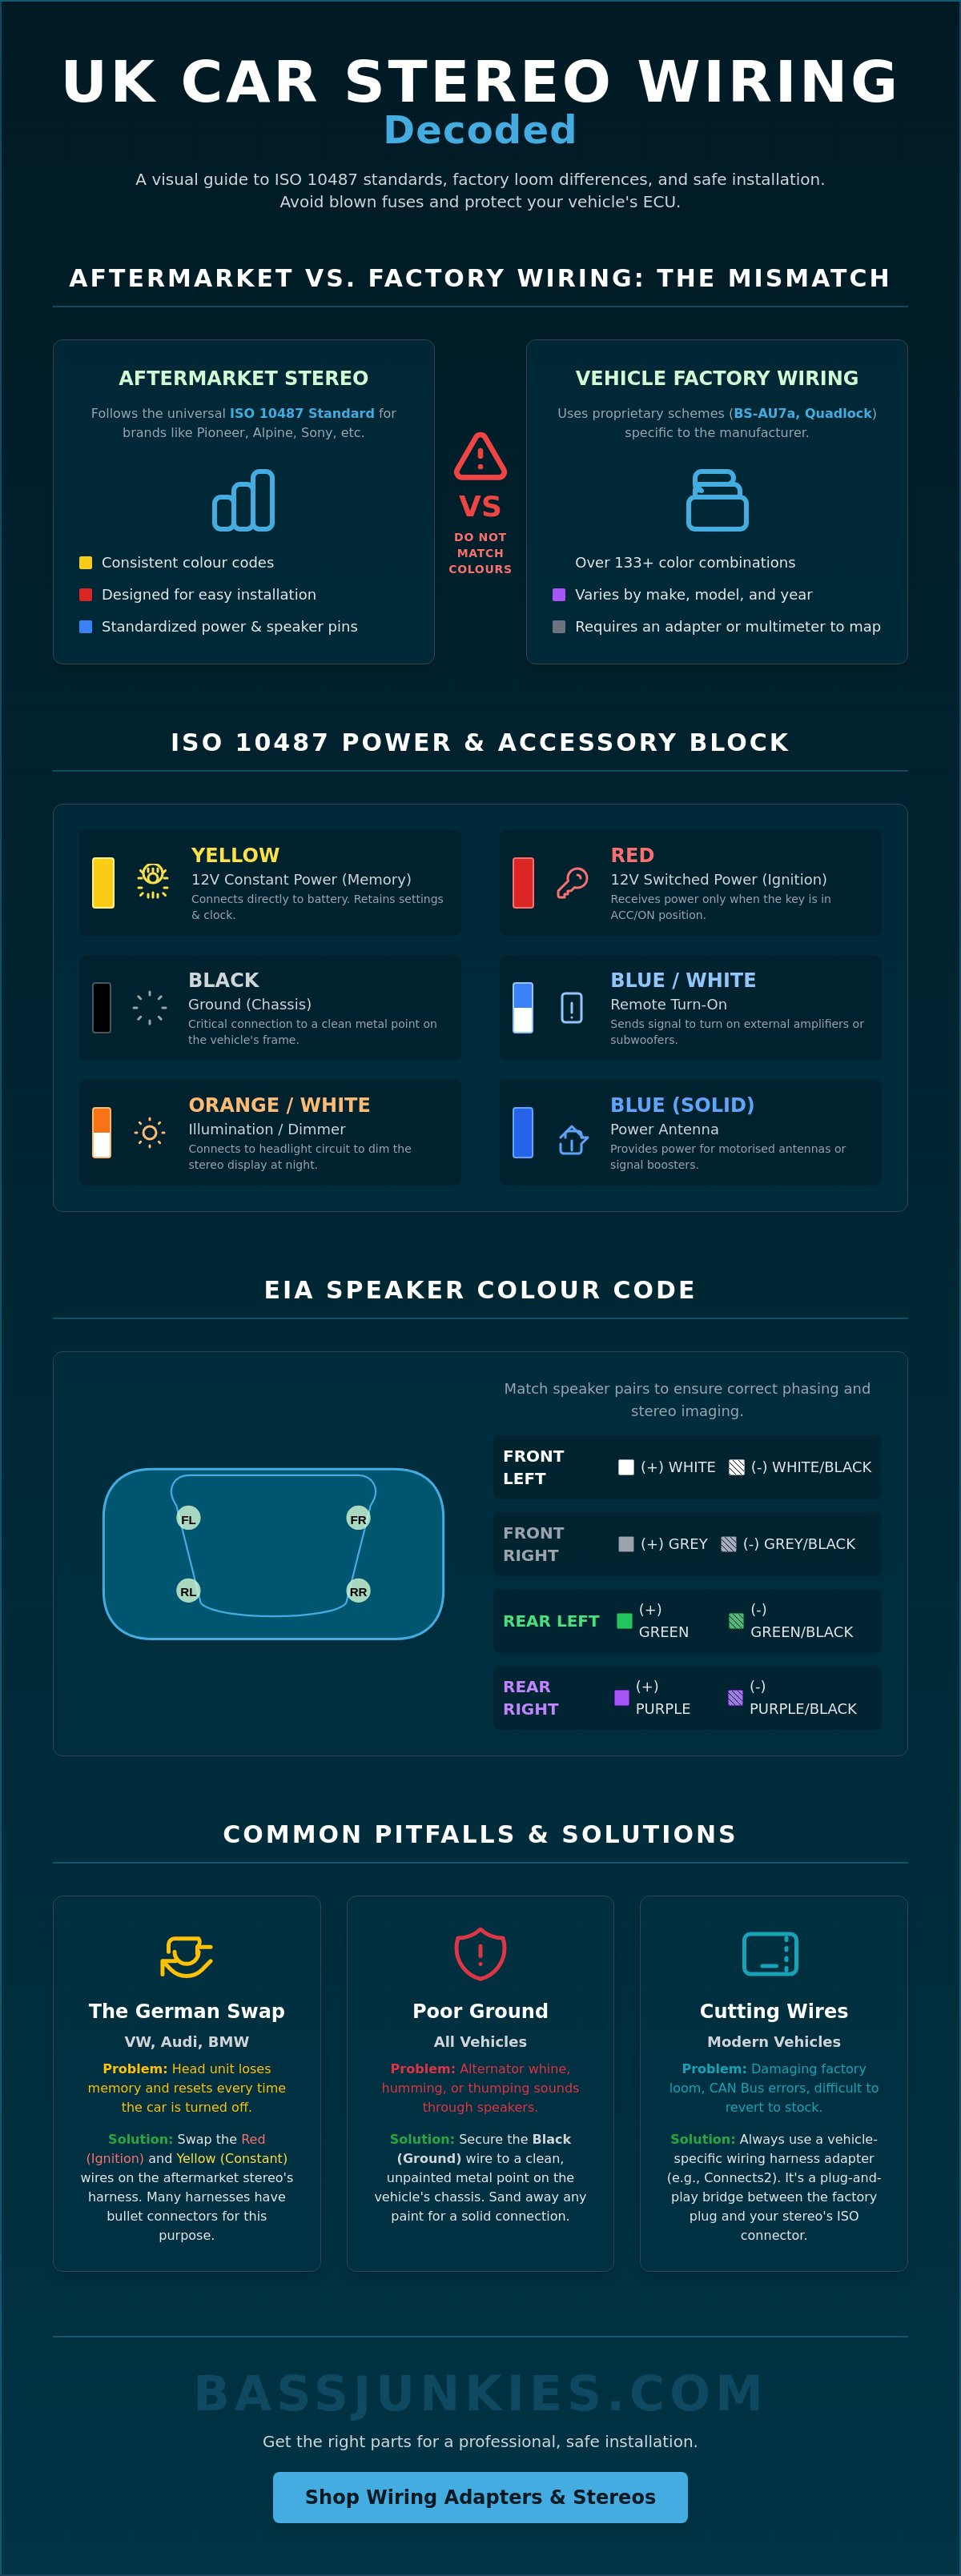
Matching a red wire to a red wire is the fastest way to blow a fuse or fry your vehicle's ECU. In the UK, aftermarket stereos follow the ISO 10487 standard where yellow is 12V permanent power, red is 12V ignition switched, and black is ground. Factory wiring often follows the BS-AU7a standard, which features over 133 color combinations including brown for the main battery feed. Understanding car stereo wiring colours UK means mapping these specific vehicle functions to the universal ISO harness instead of just matching cable jackets.
You want that thumping bass and crystal-clear audio without the risk of a massive electrical short. This guide identifies every wire in your loom and explains which adapter bridges the gap between factory plugs and your new Pioneer or Alpine head unit. We'll break down the ISO power and speaker blocks, explain the shift to Quadlock connectors since 2003, and show you how to retain steering wheel controls using CAN Bus interfaces.
Key Takeaways
- Mastering the ISO 10487 standard is essential for understanding car stereo wiring colours UK to ensure your power and speaker connections match the head unit.
- Learn to distinguish between constant 12V memory power and switched ignition power to prevent battery drain or blown fuses during installation.
- Correctly identify the standard EIA speaker colour codes for front and rear channels to achieve perfect phase and crystal-clear stereo imaging.
- Discover why German brands like VW and BMW require specific wire swaps and how Connects2 interfaces bridge the gap between factory looms and aftermarket stereos.
- Follow a professional step-by-step process for connecting your new Alpine or Pioneer unit while protecting your vehicle's sensitive ECU and electrical systems.
What are the standard car stereo wiring colours in the UK?
Standard car stereo wiring in the UK follows the EIA (Electronic Industries Alliance) colour code for aftermarket head units. The primary power wires are Yellow (Constant 12V) for memory, Red (Switched 12V) for ignition, and Black for the chassis ground. For audio signals, the Blue/White wire acts as the remote turn-on lead for external car amplifiers or powered subwoofers. These standards are formalised through ISO 10487 car audio connectors, which provide the universal interface for most UK installations. Understanding car stereo wiring colours UK is the first step to ensuring your Pioneer or Alpine unit functions without blowing a fuse.
This colour scheme is the industry benchmark for brands like Kenwood, Sony, and JVC. It ensures that regardless of the brand, the harness on the back of the stereo remains consistent. Following this guide prevents the nightmare of a dead battery or a fried head unit. It's the difference between a professional-grade install and a dangerous DIY mess that could damage your vehicle's sensitive electronics.
Power and grounding wire functions
The Yellow wire must have a permanent 12V feed to keep your radio presets and clock settings saved. If your stereo loses its memory every time you turn off the engine, the Yellow and Red wires are likely swapped. The Red wire only carries current when the ignition is in the ACC or "On" position. This prevents the unit from draining the battery while the car is parked, ensuring you don't wake up to a dead vehicle.
A solid Black ground wire is the most critical connection in the entire loom. A loose or poor ground often results in "alternator whine" or a thumping sound through your car speakers. Always secure the ground to a clean, unpainted metal part of the chassis. For night driving, the Orange/White wire connects to the vehicle's headlight circuit. This triggers the head unit to dim the display automatically when you turn your lights on, preventing blinding glare during night hauls.
Accessory and antenna leads
Standard looms often include a solid Blue wire, which is distinct from the Blue/White remote lead. This solid Blue wire provides power specifically for motorised antennas or signal boosters found in many older UK vehicle models. Using the wrong wire here can lead to poor radio reception or a failed amp trigger. The Blue/White wire is dedicated to sending a low-current signal to wake up your car subwoofers when the head unit powers up.
High-performance sat-nav units may feature a Pink wire for the Speed Pulse signal. This allows the unit to track vehicle movement more accurately in tunnels where GPS signals drop. Finally, the Light Green wire is a safety feature for car stereos with screens. It must be connected to the parking brake circuit. This connection ensures video playback only works when the vehicle is stationary, keeping you on the right side of UK road laws. Always use high-quality wiring accessories to make these connections secure and reliable.
Aftermarket vs. Factory Wiring: Why the colours don't match
Factory wiring looms in the UK rarely match the universal EIA colour codes found on the back of car stereos. While aftermarket brands like Alpine or Sony use a standard set of colours, manufacturers like Vauxhall, VW, and PSA Peugeot Citroën use proprietary schemes that can lead to blown fuses if you guess. Understanding car stereo wiring colours UK means recognising that the car's internal loom is a completely different beast from the stereo's harness. You must map the vehicle's functional output to the stereo's required input using a multimeter or a vehicle-specific adapter.
This mismatch exists because car manufacturers design their electrical systems for production efficiency rather than aftermarket compatibility. For example, older British vehicles often followed the BS-AU7a standard, which features over 133 colour combinations that have nothing to do with modern ISO standards. Trying to wire a new unit by matching colours alone is a recipe for disaster. It can result in anything from a simple dead battery to a catastrophic failure of the vehicle's engine control unit (ECU).
The Red and Yellow wire swap
If your head unit resets every time you cycle the ignition, you're likely dealing with the classic German swap. Volkswagen, Audi, and BMW often reverse the positions of the permanent and switched 12V feeds in their factory plugs. The memory wire is the constant 12V feed that maintains internal software settings, clock time, and radio presets. In these vehicles, you must physically swap the Red and Yellow bullet connectors on your aftermarket harness to ensure the "constant" feed hits the right pin. This simple fix prevents the frustration of re-entering your EQ settings every single morning.
CAN-bus and digital signals
Modern UK vehicles manufactured after 2005 often ditch the traditional "switched" 12V wire entirely. Instead, they use a CAN-bus system, which sends digital data packets to tell the factory radio when to wake up. You cannot simply tap into a random wire to find an ignition feed on these cars without risking a "Check Engine" light or ECU damage. To fix this, you need Connects2 Steering Wheel Control Interfaces. These smart boxes translate digital CAN-bus signals back into an analogue 12V trigger for your new stereo. This tech is essential for keeping your steering wheel buttons functional while enjoying a massive upgrade in sound quality. For the best results, always check our latest offers on vehicle-specific integration kits.
Vauxhall and PSA models frequently deviate from standard grounding conventions. While most aftermarket units use Black for ground, some factory looms use Brown or even Green/Yellow. Connecting these incorrectly can lead to a dead unit or interference in your car speakers. Always verify the ground with a multimeter before crimping. This technical precision is what separates a thumping system from a blown fuse.
UK-Specific ISO Connectors: The bridge for your installation
The ISO 10487 standard is the universal language of UK car audio installations. Established in 1995, this standard specifies two 8-pin blocks that act as the bridge between your car's factory wiring and your new head unit. Understanding car stereo wiring colours UK involves mastering these connectors to ensure you don't have to cut a single factory wire. Using the correct ISO adapter preserves your vehicle's resale value and prevents the massive headache of tracing individual circuits with a probe.
Most UK vehicles use these two distinct blocks to separate power and signal. Block A handles the electrical juice and system triggers, while Block B is dedicated entirely to your speaker outputs. If your car was built after 2003, you might find a larger Quadlock connector instead. In these cases, a vehicle-specific Quadlock-to-ISO adapter is essential to translate the car's complex digital signals into the standard colour-coded pins your stereo expects.
Block A vs. Block B wiring
Block A is the power hub. You must identify Pin 4 and Pin 7 correctly to avoid memory loss issues. Pin 4 is the permanent 12V feed, which matches the Yellow wire on your aftermarket loom to keep your presets saved. Pin 7 is the switched 12V ignition feed, matching the Red wire. Other critical pins include Pin 8 for Ground (Black) and Pin 5 for the remote antenna or amplifier trigger (Blue). Always verify these with a multimeter before clicking the blocks together.
Block B provides the thumping audio signal to your car speakers. It features 8 wires for a standard 4-channel setup. Each speaker has a positive (solid colour) and negative (colour with a black stripe) wire. Maintaining correct polarity is non-negotiable. If you swap the positive and negative on one speaker, it will play "out of phase," which physically cancels out your low-end frequencies and kills your bass response.
Choosing the right harness adapter
Selecting the right harness depends on your vehicle's tech level. For basic installs, a standard ISO adapter is enough to get the music playing. However, if you are upgrading to modern stereo screens, you often need a high-speed data harness to handle video signals and reverse camera triggers. Many UK installers also use "SOT" leads (System Output Transceiver) when adding hands-free kits or secondary processors to a factory system without cutting the original loom.
For vehicles with steering wheel buttons, you cannot rely on a basic plastic plug. You need Connects2 Steering Wheel Control Interfaces to retain your factory controls. These smart modules translate the digital data from your car's brain into a signal your Pioneer or Kenwood unit understands. Using a proper interface ensures your volume and track skip buttons work perfectly while keeping the install clean and professional. Check our clearance section for deals on the specific adapters needed for your make and model.
The Speaker Colour Code: Mapping your sound system
Standard aftermarket speaker wiring uses four primary colours to drive your audio. White and Grey handle the front left and right channels. Green and Purple power the rear left and right. Each channel uses two wires: a solid colour for the positive terminal and a striped wire for the negative. Understanding car stereo wiring colours UK ensures your car speakers deliver the massive soundstage they were designed for.
This eight-wire system is universal across brands like Kenwood, JVC, and Sony. It allows for a straightforward connection to an ISO block. Using the correct mapping prevents cross-talk between channels. It keeps your fader and balance controls working exactly as they should. Follow this standard colour list for a perfect match:
- White: Left Front (+)
- White-Black: Left Front (-)
- Grey: Right Front (+)
- Grey-Black: Right Front (-)
- Green: Left Rear (+)
- Green-Black: Left Rear (-)
- Purple: Right Rear (+)
- Purple-Black: Right Rear (-)
Understanding speaker polarity and phase
The "Black Stripe" rule is your shortcut to a perfect install. Any wire featuring a black stripe is the negative terminal for that specific channel. If you mix these up, you'll suffer from phase cancellation. Out of phase occurs when the positive and negative wires are swapped, causing sound waves to cancel each other out. This results in a thin, hollow sound and a complete loss of thumping bass response.
Phase issues are often missed by beginners. You might think your new speakers are low quality when they are actually just fighting each other. Always double-check your connections before bolting your door panels back on. A quick polarity check ensures every driver moves in the same direction at the same time. This is the only way to achieve crystal-clear audio at high volumes.
Wiring for external amplifiers
Upgrading to a high-power system often requires moving beyond standard speaker wires. You will need to transition to RCA cables for amplifiers to send a clean signal to your boot. If your factory head unit lacks RCA outputs, use a high-to-low level converter. This device taps into your existing speaker wires to provide the low-level signal needed for a 4-channel amplifier.
Don't forget the Blue/White remote turn-on wire. This lead sends a low-current 12V signal to tell your subwoofers to wake up when the stereo powers on. Without this connection, your amp stays in standby mode and you get zero sound. It's an essential part of understanding car stereo wiring colours UK for any serious build. Ready to push your system to the limit? View our latest offers on high-performance audio kits.
Step-by-Step: Safely wiring your new head unit
To safely wire a head unit, you must first disconnect the negative battery terminal to eliminate the risk of shorting out the vehicle's ECU. Connect the aftermarket stereo loom to the vehicle-specific ISO adapter rather than cutting into the factory harness. Understanding car stereo wiring colours UK requires you to verify the permanent and switched 12V feeds before the final crimp. Secure all joints with professional crimp connectors or solder; never use "choc blocks" as they vibrate loose and cause electrical fires. Test the unit for memory retention and audio clarity before sliding it into the dashboard cage.
This process ensures your high-performance car stereos from Pioneer or Alpine perform at their peak. A single loose wire can introduce resistance that chokes your sound quality or causes the unit to reboot during heavy bass hits. Following this technical sequence protects your investment and keeps your vehicle's warranty intact. It’s the final hurdle between a pile of wires and a thumping audio experience.
Tools and safety equipment
Professional results require professional tools including wire strippers, a ratcheting crimping tool, and a digital multimeter. You must use a multimeter instead of a traditional test light on any vehicle built after 2000. Test lights can draw enough current to accidentally trigger airbag sensors or fry sensitive data lines in the CAN-bus system. A multimeter provides a precise reading, allowing you to distinguish between a true 12V power source and a low-voltage data signal.
Heat shrink tubing is the industry standard for insulating your connections. Slide the tubing over the wire before soldering, then use a heat gun to create a watertight, vibration-proof seal. This prevents bare copper from touching the metal sub-dash, which is the leading cause of blown fuses in UK car audio installs. Investing in these wiring accessories is the best way to ensure a "fit and forget" installation.
Troubleshooting your connections
If your head unit refuses to power up, check the 10A or 15A fuse located on the back of the chassis. If that is intact, use your multimeter to verify that the Red and Yellow wires are receiving 12V when the ignition is on. Ground loops are the primary cause of "alternator whine" through your car speakers. Fix this by moving the Black ground wire to a dedicated, unpainted bolt on the vehicle's floor or bulkhead.
Before you clip the trim panels back into place, perform a final power check on your security and safety equipment. High-end installs often share power feeds with dash cams or parking sensors. Ensure your Nextbase dash cam still receives a constant feed for its parking mode. Once confirmed, tuck the loom neatly using cable ties to prevent rattles, then enjoy the crystal-clear output of your new system. For more expert advice, check our latest offers on complete installation kits.
Master your install and unleash the bass
Mapping your harness correctly is the final step toward crystal-clear audio and thumping performance. By matching the EIA standard colours to your specific vehicle loom, you avoid the risk of blown fuses and damaged electronics. Understanding car stereo wiring colours UK means you can confidently install a new head unit without compromising your vehicle's safety systems.
Established in 1995, Bass Junkies is the UK’s No. 1 specialist for car audio, providing expert advice and high-end electronics. We offer nationwide delivery on all our massive stock levels, ensuring you get the gear you need fast. Don't settle for factory sound when the ultimate upgrade is just a few clicks away.
Upgrade your ride with the UK’s best selection of car stereos and fitting kits at Bass Junkies and start your build today.
Frequently Asked Questions
What is the most common car stereo wiring colour code in the UK?
The ISO 10487 standard is the universal colour code for almost every aftermarket car stereo sold in the UK. This standard dictates that Yellow is for constant 12V power, Red is for switched ignition, and Black is for ground. It is the language used by major brands like Alpine, Kenwood, and Sony to ensure cross-brand compatibility. Following this standard is the only way to ensure your head unit functions correctly without risking a short circuit.
Why is my car stereo losing its memory every time I turn off the ignition?
Your stereo is losing its memory because the permanent 12V and switched 12V wires are likely reversed in the harness. This is a frequent issue in German vehicles like VW and Audi where the factory pin positions don't match the standard ISO layout. To fix this, swap the Red and Yellow bullet connectors on your stereo's loom. This ensures the unit receives a constant feed to save your radio presets and clock settings.
Can I wire my car stereo directly to the battery?
You can wire a car stereo directly to the battery, but you must install an inline fuse within 30cm of the battery terminal to prevent a fire. This method is often required for high-power 4-channel amplifiers or massive powered subwoofers that exceed the factory loom's current capacity. Never connect the switched Red wire directly to the battery terminal. Doing so keeps the unit powered 24/7 and will completely drain your battery in less than 48 hours.
What colour is the ground wire on a UK car stereo?
The ground wire on an aftermarket UK car stereo is solid Black. This wire must be secured to a clean, unpainted metal part of the vehicle's chassis to provide a solid return path for the electrical current. In older British vehicles using the BS-AU7a standard, you might find different factory colours like Brown used for battery feeds. Always use a multimeter to verify your ground point during your understanding car stereo wiring colours UK project.
How do I identify speaker wires if they don’t match the standard colours?
Identify unknown speaker wires by using a 9V battery to "pop" the speakers and trace the connections. Briefly touch a pair of wires to the battery terminals; a faint clicking sound from a speaker identifies that specific channel. If the speaker cone moves outward, the wire touching the battery's positive terminal is the positive speaker lead. This technical shortcut allows you to map a factory loom in minutes without needing a vehicle-specific wiring diagram.
Do I need a wiring harness adapter for an aftermarket stereo?
You need a wiring harness adapter for approximately 95% of UK vehicles manufactured after 2000 to avoid cutting the original factory wires. These adapters act as a bridge between your car's proprietary plug and the universal ISO connectors on your new Pioneer or Kenwood unit. Using a Connects2 interface also allows you to retain steering wheel controls and digital CAN-bus signals. It is the safest way to achieve a professional, plug-and-play installation.
What does the blue and white wire on my stereo do?
The Blue and White wire is the remote turn-on lead that triggers external amplifiers and powered subwoofers to power up. It sends a low-current 12V signal only when the head unit is switched on, ensuring your audio gear doesn't stay active and drain the battery. Don't confuse this with the solid Blue wire, which is specifically for power antenna triggers. Correctly identifying this wire is essential for understanding car stereo wiring colours UK when building a high-performance system.
How do I tell the difference between a constant and switched 12V wire?
A constant 12V wire provides power at all times, while a switched wire only carries current when the ignition key is in the ACC or ON position. Use a digital multimeter to test the wires in your factory plug with the ignition off to find the constant feed. Then, turn the key to the first click and re-test the remaining wires to find the switched source. This distinction is critical to prevent your stereo from staying on and killing your battery overnight.