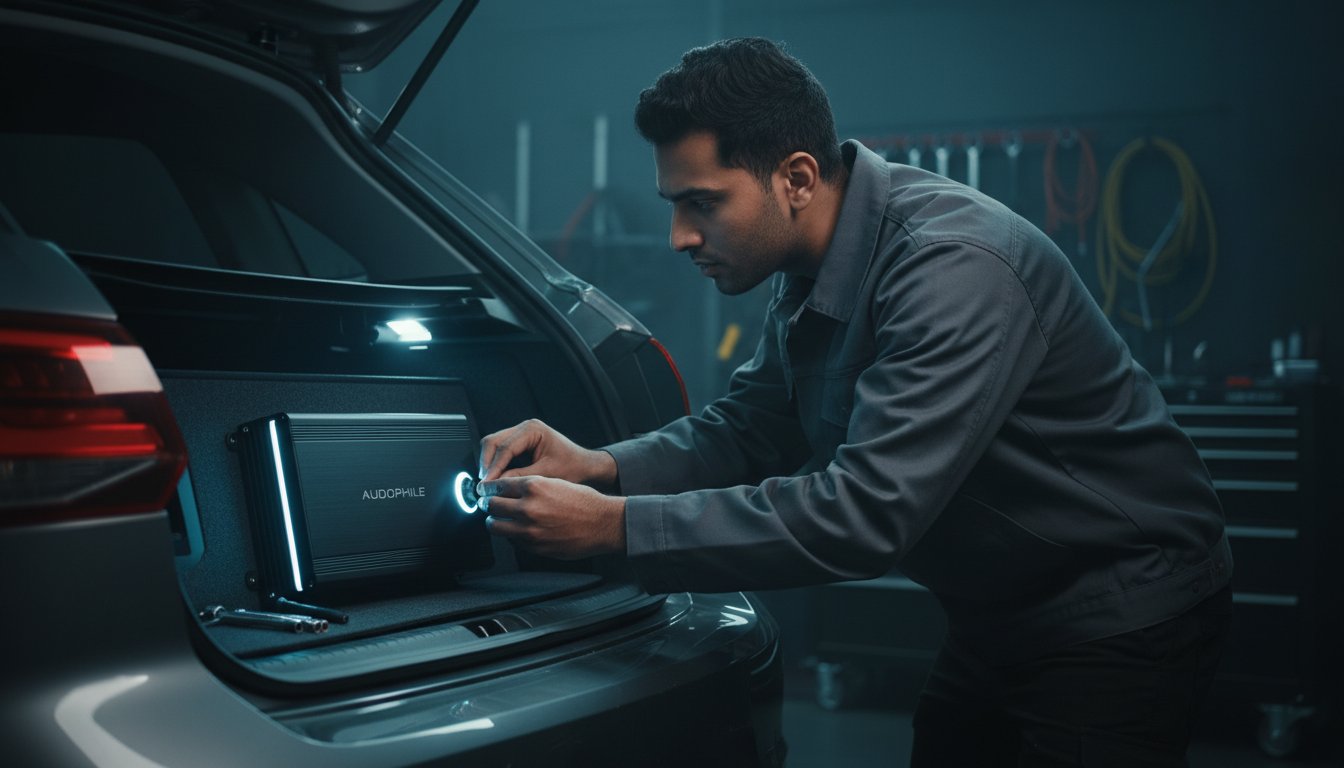
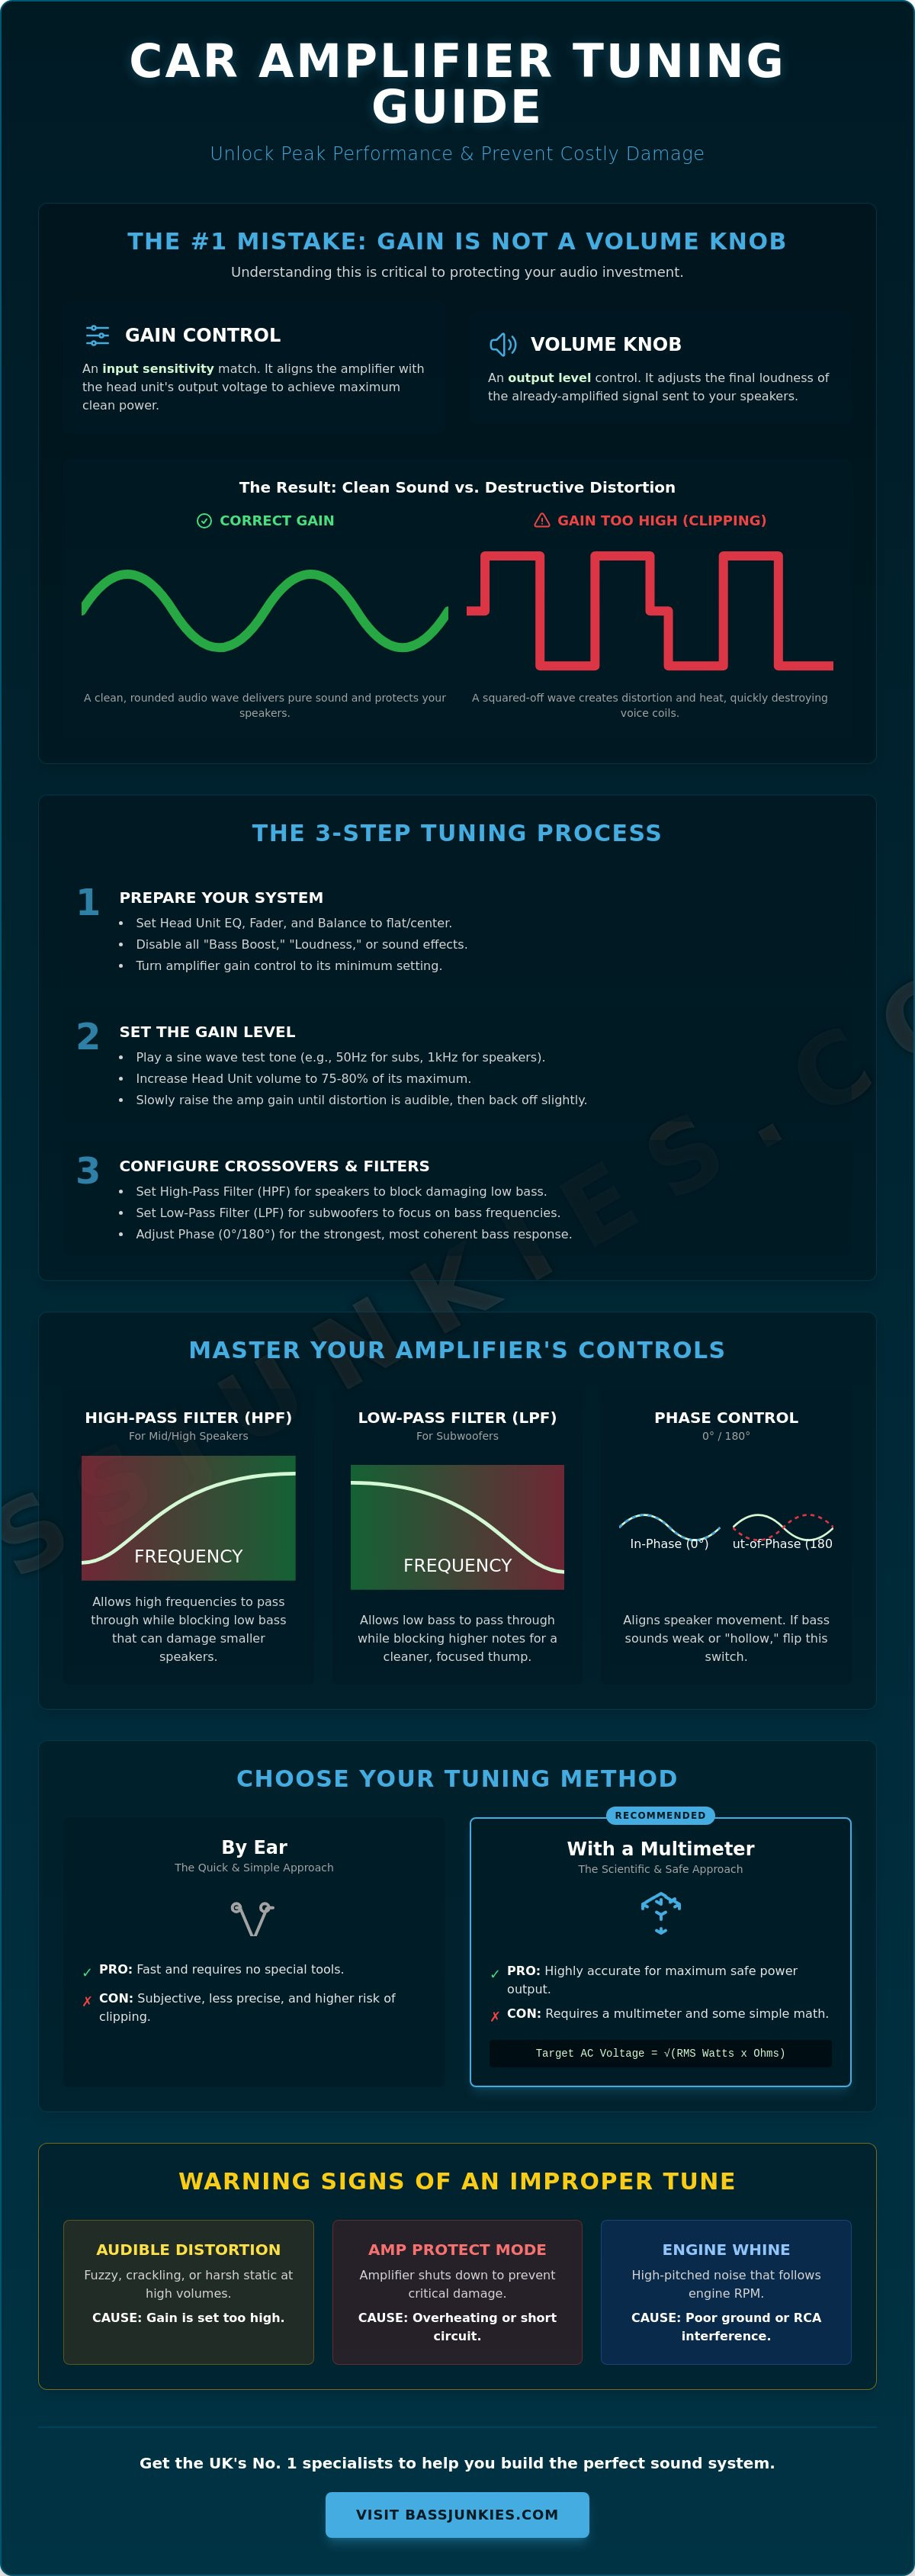
Your gain control is not a volume knob; it is a precision voltage matching tool that determines whether your system screams with clarity or dies in a cloud of smoke. To tune a car amplifier correctly, you must follow a three-stage process: reset all head unit and amp EQ settings to flat, match the amplifier's input sensitivity to the source unit's output voltage, and set crossover filters to protect your drivers. This car amplifier tuning guide for beginners ensures you maximize the performance of your 4-channel amplifier or monoblock without risking permanent damage.
You want massive, thumping bass and crystal-clear audio at high volume, but confusing terms like LPF and HPF often make the process feel like a gamble. It's frustrating to invest in high-end gear only to hear distortion when you turn up the heat, especially when you crave the thrill of a heavy bassline. We understand that need for absolute performance and equipment reliability.
This guide teaches you how to dial in your gain, set crossovers, and eliminate distortion to get the ultimate performance from your car audio system. We will walk through the exact steps to protect your speakers while unlocking the raw power of your setup. Let's get your system sounding like the UK's No. 1 specialist built it themselves.
Key Takeaways
- Learn how to match your amplifier’s input sensitivity to the head unit’s output signal to achieve maximum RMS power without audio clipping.
- Identify the difference between gain controls and volume knobs to prevent sending distorted signals to your speakers.
- Follow this car amplifier tuning guide for beginners to choose between the fast ear-tuning method and the scientific accuracy of the multimeter method.
- Master the use of High-Pass and Low-Pass filters to direct specific frequencies to the correct drivers for crystal-clear sound.
- Recognise signs of improper calibration, such as the amplifier entering Protect Mode or generating engine whine, to ensure long-lasting equipment life.
What is car amplifier tuning and why is it essential for your sound system?
Tuning is the technical process of synchronising your amplifier's input sensitivity with the signal voltage produced by your head unit. It isn't about making the system louder; it's about making it cleaner. This car amplifier tuning guide for beginners helps you find the sweet spot where your amp delivers peak performance without the signal clipping. Clipping occurs when the amplifier tries to push more voltage than its power supply allows, resulting in a squared-off wave that generates heat rather than sound.
Proper calibration ensures you get the maximum RMS power out of your hardware. Without it, you risk permanent damage to your car speakers or subwoofers. When an amp clips, the voice coils in your drivers overheat rapidly. This leads to burned coils, frozen motors, and expensive repair bills. By matching levels correctly, you transform a muddy, distorted mess into a high-fidelity, thumping experience that stays crystal-clear even at high volumes.
A well-tuned vehicle audio system relies on this precision to maintain a high signal-to-noise ratio. You want the cleanest possible signal entering the power amplifier so that the only thing being amplified is the music, not the electrical interference. By following this car amplifier tuning guide for beginners, you ensure every watt is used for sound quality, not destructive heat.
The critical difference between gain and volume
Think of gain as a gatekeeper for the incoming audio signal. It is an input sensitivity control, not a power knob that adds extra wattage. Increasing the gain beyond the point of signal matching does not increase the amp's maximum wattage capability; it just forces the amp to reach full output earlier in the volume range. Treating the gain dial like a volume knob is the number one cause of blown subs because it forces the amplifier into constant distortion.
Why factory settings are never 'plug and play'
Every car stereo outputs a different voltage via RCA or high-level inputs, typically ranging from 2V to 6V. Amplifiers are shipped with generic, neutral settings designed to be safe for a wide variety of setups, but they won't match your specific equipment configuration. These neutral out-of-the-box settings are just a starting point for calibration. You must adjust them to account for the unique electrical characteristics of your high-performance subwoofers and source unit to get the results you paid for.
Understanding the primary settings on your car amplifier
To tune a car amplifier effectively, you must master four key controls: Gain, High-Pass Filters (HPF), Low-Pass Filters (LPF), and Phase. The Gain dial synchronises the amplifier's input sensitivity with the head unit's RCA output voltage. HPF and LPF act as electronic fences, directing high frequencies to your component speakers and low frequencies to your subwoofers. Phase alignment ensures all speaker cones move in the same direction at the same time to prevent bass cancellation. This car amplifier tuning guide for beginners provides the essential foundation for a distortion-free, high-fidelity setup.
The Gain or Level control is the gatekeeper for the incoming audio signal. It determines how much voltage the amplifier needs to see to reach its full output potential. If you set this too high, the amp tries to produce more power than its internal components allow, creating a clipped signal that sounds like harsh static. If you set it too low, you aren't getting the massive, thumping performance you paid for. It's a balance of precision, not a shortcut to volume.
Phase is often a simple 0 to 180-degree switch. It's designed to solve timing issues where the sound waves from your subwoofer reach your ears at a different time than the waves from your door speakers. If your bass sounds thin or "hollow," flipping this switch can often bring the system into perfect harmony. If you're building a new system from scratch, you can browse professional-grade car amplifiers to find units with fine-tuned phase and crossover controls.
High Pass Filters (HPF) and Low Pass Filters (LPF) explained
Crossovers are the filters that decide which frequencies reach which speakers. A High Pass Filter (HPF) protects smaller drivers by blocking low, damaging bass notes that cause over-excursion. Most 6.5-inch door speakers perform best with an HPF set around 80Hz. Conversely, a Low Pass Filter (LPF) ensures subwoofers only play deep frequencies, typically below 80Hz. This prevents your sub from trying to play vocals, which sounds muddy and strains the equipment. Setting these points correctly eliminates "frequency overlap," where multiple speakers try to play the same notes, resulting in a cluttered soundstage.
The 'Bass Boost' trap: When to use it and when to avoid it
Bass boost is a narrow-band equaliser that adds massive gain at a specific frequency, usually around 45Hz. While it sounds tempting, it's often a trap for enthusiasts. Adding 6dB of boost requires the amplifier to produce four times the power at that specific frequency, which almost always leads to immediate signal clipping. Most audio pros recommend keeping the bass boost at zero during the initial tuning process. If your system lacks impact, you'll get much better results if you upgrade to a high-performance car subwoofer instead of artificially pushing a struggling amplifier to its breaking point.
How to tune a car amplifier: Ear vs. Multimeter methods
To tune a car amplifier, you must choose between the intuitive Ear Method or the data-driven Multimeter Method. Both approaches require you to first reset your head unit EQ settings, including bass, treble, and loudness, to zero or flat. This ensures you are tuning the raw signal rather than an equalised one. This car amplifier tuning guide for beginners focuses on these two accessible techniques to prevent clipping and maximise output.
While professional installers often use an oscilloscope for 100% precision by visually tracking the sine wave, this is generally unnecessary for a home setup. The ear method is the fastest way to get your 4-channel amplifier up and running. However, the multimeter method provides a scientific safety net that protects your car speakers from invisible electrical stress and clipping.
Regardless of the method you choose, the goal is to find the maximum clean output of your specific hardware. You aren't just looking for volume; you're looking for the threshold where the amplifier's power supply reaches its limit. Accurate tuning ensures your high-performance subwoofers deliver thumping bass without the risk of a melted voice coil.
The 'Ear Method' for quick tuning
This method is ideal for enthusiasts who want a massive improvement without investing in specialised tools. It relies on your ability to hear the subtle transition from clean audio to the "crackling" or "fuzzy" sound of harmonic distortion. Always perform this calibration with the engine running to ensure the amplifier receives its full 14.4V charging voltage rather than a resting 12.6V battery charge.
Slowly increase the gain until you hear the audio quality degrade, then immediately back it off by a few degrees. This creates a safety margin that keeps your speakers safe during peak musical transitions. It's a fast, results-oriented way to get crystal-clear sound if you have a keen ear for detail.
The Multimeter Method for technical precision
Technical precision requires a basic digital multimeter and a bit of Ohm's Law math. First, calculate your target AC voltage using the formula: Square Root of (Watts RMS x Ohms). For example, a 500W RMS sub at 2 Ohms requires a target of 31.62V. This ensures your monoblock amplifier never exceeds its rated thermal limits.
Disconnect your speakers from the amp to prevent hearing damage and measure the AC voltage directly at the amplifier terminals. Play a standard test tone, usually 50Hz for subs and 1kHz for speakers, and adjust the gain dial until the multimeter matches your calculated target exactly. This removes the guesswork and guarantees a crystal-clear signal every time you turn the key.
A step-by-step guide to setting your amplifier gains
To set your amplifier gains correctly, start with the gain and bass boost dialled all the way down to their minimum positions. Set your head unit volume to roughly 75% of its maximum range to provide a strong, clean signal to the amp. Play a high-quality, non-compressed audio track or a specific test tone, such as 1kHz for speakers or 40Hz for subwoofers. Slowly increase the gain until you hear a change in the sound or the 'Clip' light begins to flicker, then back the gain off slightly, about 1/8th of a turn. This car amplifier tuning guide for beginners ensures you hit peak performance without risking thermal failure.
The 75% volume rule is essential because most head units introduce internal signal clipping at the top 10-15% of their volume range. By using 75%, you're capturing the maximum voltage the stereo can output before its internal circuitry starts to distort the wave. This "clean" signal is the foundation of your entire build. If you notice the audio gets "crunchy" before you even reach the 75% mark, stop there. Your specific source unit might have a lower distortion threshold, and forcing it higher will only send "dirty" power to your car amplifier, which eventually leads to thermal shutdown or a blown voice coil.
Preparing your head unit and EQ settings
Before touching any dials on the amp, you must neutralise your stereo. Turn off all "Loudness," "Bass Engine," or "Super Bass" features, as these artificially boost frequencies and will ruin your calibration. Set the fader and balance to the centre position to ensure an even signal is sent to all channels. You can check out our Car Audio Buying Guide 2026 to see if your current head unit is capable of delivering the clean pre-amp voltage required for a high-end build.
Dialling in the crossover frequencies
Crossovers act as the traffic police for your audio frequencies. For subwoofers, start with the Low Pass Filter (LPF) at 80Hz and adjust it based on your vehicle's cabin size; larger SUVs often benefit from a slightly higher setting to fill the space. For standard 6.5-inch door speakers, set the High Pass Filter (HPF) between 60Hz and 80Hz to keep deep bass from over-extending the cones. If your equipment supports it, use a 24dB slope for a sharper cut-off, which provides much cleaner frequency separation between your mids and your sub compared to a standard 12dB slope. This prevents "muddy" overlapping and keeps your soundstage sharp. Ready to push your system to the limit? Explore our massive range of subwoofers to find your perfect match.
Troubleshooting common tuning mistakes and protecting your equipment
If your amplifier is getting hot or entering Protect Mode, your gain is likely too high, causing the internal power supply to clip. A high-pitched whine that follows engine RPM indicates a ground loop or a poor ground connection that needs immediate attention. Never use FM radio for tuning as the signal is too compressed for accurate calibration; use a high-quality digital track or test tone instead. This car amplifier tuning guide for beginners ensures you protect your investment while maintaining crystal-clear audio. You must re-tune your system every time you upgrade your car speakers or add a new subwoofer to account for changes in impedance and power handling.
Alternator whine is a common headache that often stems from the ground wire being attached to a painted surface or a loose chassis bolt. Scrape away any paint to ensure a metal-to-metal connection for the lowest possible resistance. High-quality RCA cables also help prevent electromagnetic interference from the vehicle's electrical system. If the noise persists after checking the ground, ensure your signal cables are not running parallel to your main power wire.
Using FM radio for tuning is a rookie mistake because the broadcast signal is limited in dynamic range and frequency response. This leads to a false gain setting that will clip as soon as you play a high-bitrate FLAC or WAV file. Always use the same source type you plan to listen to most frequently. This provides the most accurate representation of how the amplifier will handle real-world power demands.
Identifying clipping and thermal shutdown
Clipping is audible as a "crunchy" or "flat" version of your music where the peaks of the sound waves are chopped off. This creates excessive heat in the amplifier's MOSFETs, eventually triggering a thermal shutdown to prevent internal damage. To avoid this, ensure your amp has at least 2 inches of clearance on all sides for proper ventilation. If the unit is tucked in a tight space, consider adding a small 12V cooling fan to maintain airflow and protect your gear.
Subwoofer phase adjustment for better bass
Phase alignment is the secret to making your bass feel like it's hitting you from the dashboard rather than the boot. Sit in the driver's seat and have a friend flip the phase switch between 0 and 180 degrees while playing a track with a consistent bassline. The correct setting is whichever one sounds louder and more impactful at your listening position. Proper phase alignment prevents the subwoofer and door speakers from "cancelling" each other out, which happens when one cone moves out while the other moves in. If you're ready to upgrade your low-end, browse our latest high-performance subwoofers to find a driver that matches your amp's power.
Unlock the ultimate sound from your car audio system
You now have the technical blueprint to transform your system into a crystal-clear powerhouse. This car amplifier tuning guide for beginners has shown you that gain is a precision tool for signal matching rather than a simple volume dial. You also understand how to use High Pass and Low Pass filters to protect your drivers from destructive frequencies. Mastering these settings is the only way to get massive, thumping performance without the risk of blowing your speakers.
Proper phase alignment and the 75% volume rule ensure your system delivers maximum impact without hitting thermal shutdown. If you're ready to upgrade your hardware to match your new tuning skills, we have you covered. As the UK's No. 1 car audio specialist since 1995, we provide huge savings on elite brands like Pioneer, Alpine, and Kenwood. Our Wolverhampton workshop offers expert technical support for every type of build.
Take control of your soundstage and push your equipment to its true potential. Shop our range of high-performance car amplifiers for ultimate power and experience the difference that professional-grade hardware makes. Your journey toward the perfect high-fidelity setup starts today. Get out there and dial it in.
Frequently Asked Questions
Is the gain knob the same as the volume knob?
No, gain is an input sensitivity control that matches the head unit's output voltage to the amplifier's input stage. It doesn't increase the amp's maximum wattage; it just determines how much signal is needed to reach full power. Using it as a volume knob often leads to immediate signal clipping and thermal damage to your voice coils. It's about signal synchronisation, not raw power.
How do I know if my car amplifier is clipping?
You can identify clipping by listening for a distorted texture in the audio peaks or by watching for a dedicated 'Clip' LED on your amplifier chassis. Clipping occurs when the amplifier's power supply cannot meet the signal demand, resulting in a squared-off wave. This creates excessive heat that can melt a subwoofer's internal components in minutes. If the sound loses its punch and becomes fuzzy, you've hit the limit.
What frequency should I set my subwoofer crossover to?
Most subwoofers perform best with a Low Pass Filter (LPF) set at 80Hz. This ensures the sub only handles deep, non-directional bass while leaving the vocals and mid-range to your door speakers. If your cabin is exceptionally large, you might increase this to 100Hz to fill the space. However, anything higher typically results in a 'muddy' soundstage that localises the bass to your boot rather than the front stage.
Can I tune my amplifier without a multimeter?
Yes, you can tune by ear using a high-quality test tone to detect the threshold of audible distortion. While less scientifically accurate than using a multimeter, the ear method is a reliable part of any car amplifier tuning guide for beginners. You simply find the point where the audio degrades and back off the gain by about 1/8th of a turn to create a safe operating margin for your equipment.
Why does my amp go into protect mode when I turn the volume up?
Protect mode usually triggers because the gain is set too high or the speaker impedance is lower than the amplifier's stable rating. When the amp pushes more current than its MOSFETs can handle, it shuts down to prevent permanent failure. You should also check your ground connection for high resistance. Ensure your wiring matches the amp's 2-ohm or 4-ohm stability requirements to keep the music playing.
Does the type of music I play affect how I should tune my amp?
Yes, different genres have varying levels of recorded gain and dynamic range. Heavy bass tracks in EDM or Hip-Hop reach the amplifier's clipping point much sooner than classical or acoustic recordings. This car amplifier tuning guide for beginners recommends using your most bass-heavy tracks during calibration. This ensures your amplifier stays within its safe limits regardless of which playlist you choose to blast during your drive.
What is the 75% volume rule for car stereos?
The 75% rule states you shouldn't set your head unit volume higher than three-quarters of its maximum range during calibration. Most stereos introduce internal signal distortion at the top 10% to 15% of their output scale. Tuning at this 75% mark ensures the amplifier receives the cleanest possible signal before it begins its own work. This prevents 'dirty' power from being amplified and destroying your high-end speakers.