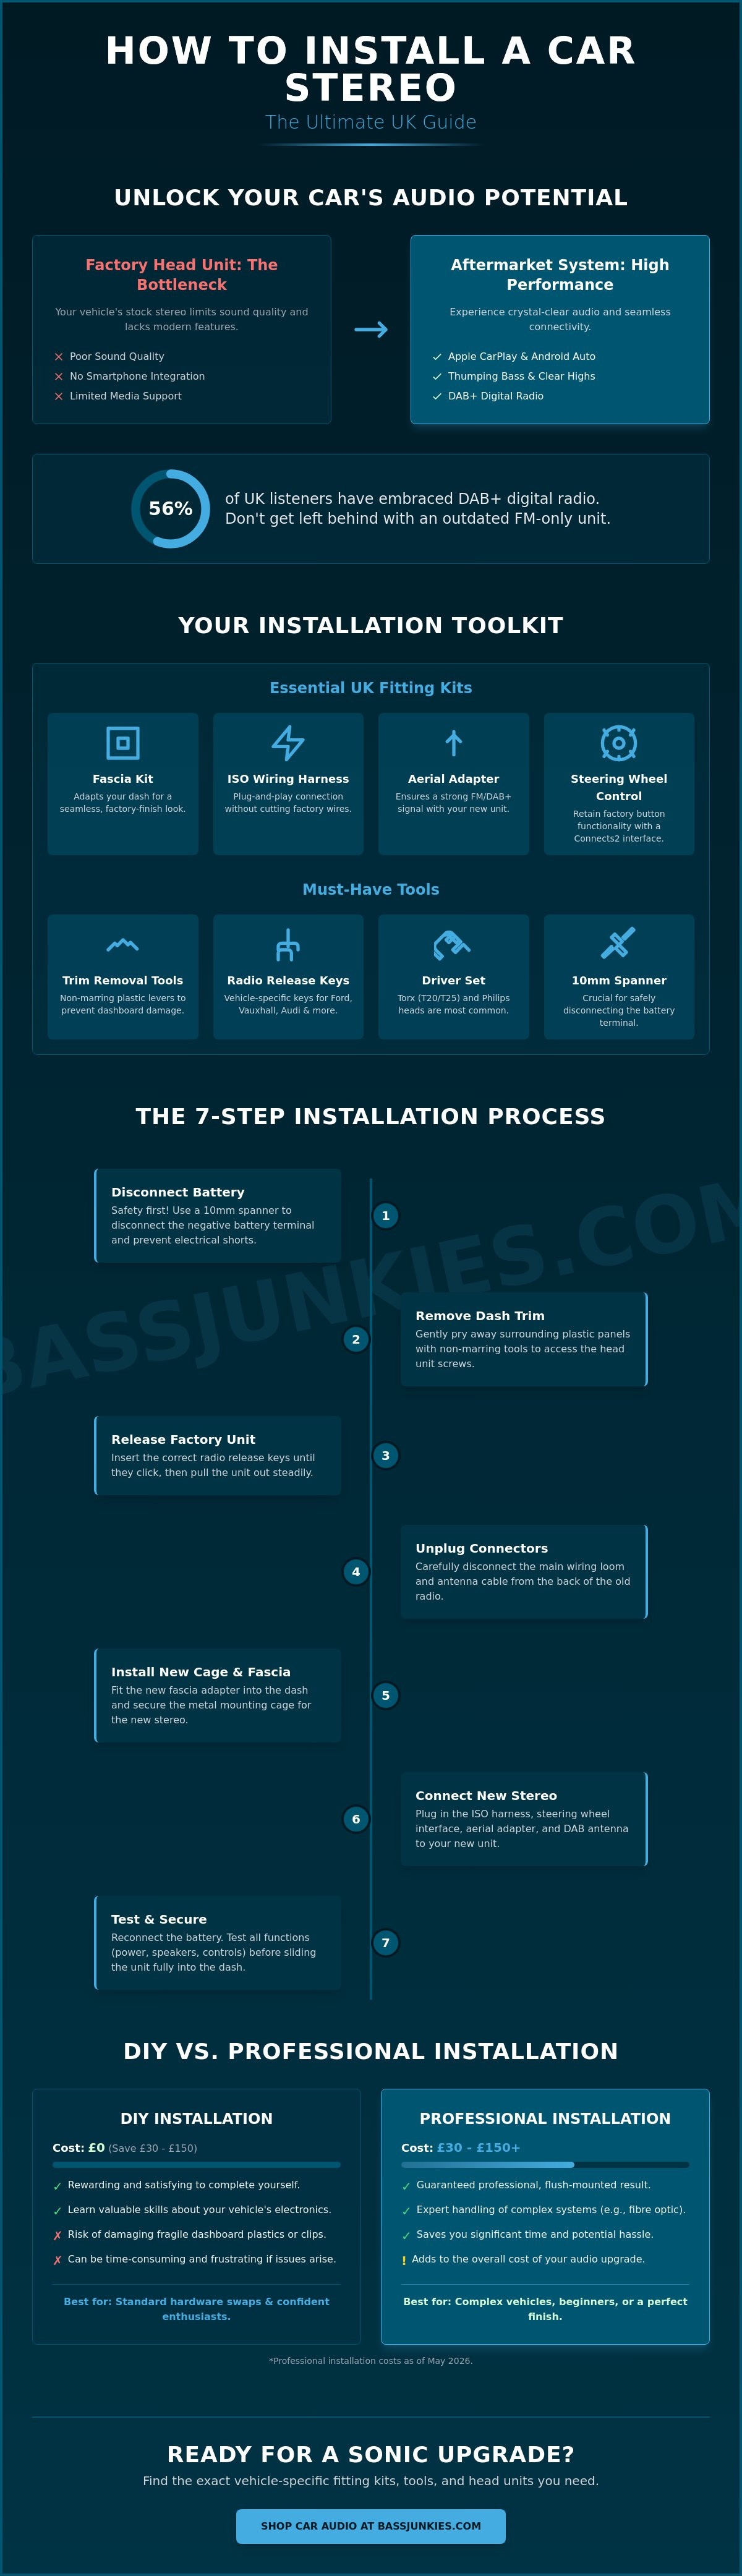
Your factory head unit is the primary bottleneck in your vehicle's audio system. Successful installation requires a vehicle-specific fascia kit, an ISO wiring harness adapter, and a DAB+ antenna to support the 56% of UK listeners now using digital platforms. This how to install a car stereo UK guide provides the exact steps for removing the OEM unit with release keys and integrating a steering wheel control interface to maintain factory functionality. With professional UK installation costs ranging from £30 to £150 as of May 2026, mastering these technical steps allows for a professional-grade, flush-mounted result.
You want thumping bass and crystal-clear smartphone integration without snapping fragile plastic dash clips or losing your steering wheel controls. We promise a complete roadmap that covers everything from CAN bus wiring to mounting high-performance Pioneer or Alpine head units. This guide previews the essential tools, the specific Connects2 interfaces required for UK models, and the exact wiring steps to transform your dashboard into a high-octane audio hub. You'll move from a weak factory setup to a high-performance system with full Apple CarPlay and Android Auto connectivity.
Key Takeaways
- Use professional trim removal tools and vehicle-specific fascia kits to ensure a flush finish without damaging your dashboard plastic.
- Follow this how to install a car stereo UK guide to safely remove factory units using brand-specific radio release keys for Ford, Vauxhall, and Audi models.
- Retain your steering wheel button functionality by integrating a Connects2 or Aerpro interface between the vehicle harness and your new head unit.
- Ensure crystal-clear digital reception by correctly mounting a glass-mount DAB+ antenna and securing the metal mounting cage within the new fascia.
- Identify complex MOST fibre-optic or deeply integrated infotainment systems that may require professional coding rather than a standard hardware swap.
Essential Tools and UK Fitting Kits for Your Installation
Installing an aftermarket system requires four core components: a vehicle-specific fascia kit, an ISO wiring harness adapter, an aerial adapter, and a set of non-marring trim removal tools. Most UK vehicles use integrated dashboards that don't follow standard rectangular dimensions. This makes a fascia panel essential for a flush, professional finish. This how to install a car stereo UK guide focuses on the technical hardware needed to convert your factory aperture into a standard Single DIN (2-inch tall) or Double DIN (4-inch tall) slot. Using an ISO harness ensures plug-and-play connectivity between your car's loom and the new unit. This prevents the need to cut factory wires and maintains your vehicle's resale value.
The Anatomy of a UK Fitting Kit
UK cars often feature curved or irregularly shaped factory dashboards. A vehicle-specific fascia panel is critical because it adapts these unique shapes to the standard dimensions of an Automotive head unit. Without this, you'll be left with unsightly gaps and exposed metal cages. We stock a massive range of kits designed for a factory-standard look that accommodates the latest touchscreens.
The ISO harness adapter is your lifeline. It bridges the gap between your car's proprietary wiring and the universal ISO plug found on aftermarket car stereos from brands like Pioneer and Alpine. You must identify the correct harness for your specific make and model to retain power, ground, and speaker outputs. Don't forget the aerial adapter. UK vehicles frequently use Fakra or ISO antenna connections that differ from the standard DIN plug on new units. Using the wrong one results in weak signal and dropped stations.
Must-Have Installation Tools
Forget using a flat-head screwdriver to pry your dash. You will scuff the plastic or snap fragile clips. Professional-grade, non-marring plastic trim removal tools are non-negotiable for a clean install. These allow you to apply even pressure to pop clips without leaving permanent marks on your interior. It's the difference between a pro job and a ruined dashboard.
Most UK manufacturers, including Ford, Vauxhall, and Volkswagen, use Torx (T20/T25) or Philips head screws to secure the head unit chassis. Keep a full set of precision drivers ready. While we always recommend a plug-and-play harness, having high-quality wire strippers and crimps on hand is smart for custom ground points or bypass triggers. You can find these essentials in our car audio accessories collection. We provide the expert gear you need to get the job done right the first time and achieve thumping performance.
Removing Your Factory Head Unit Without Damage
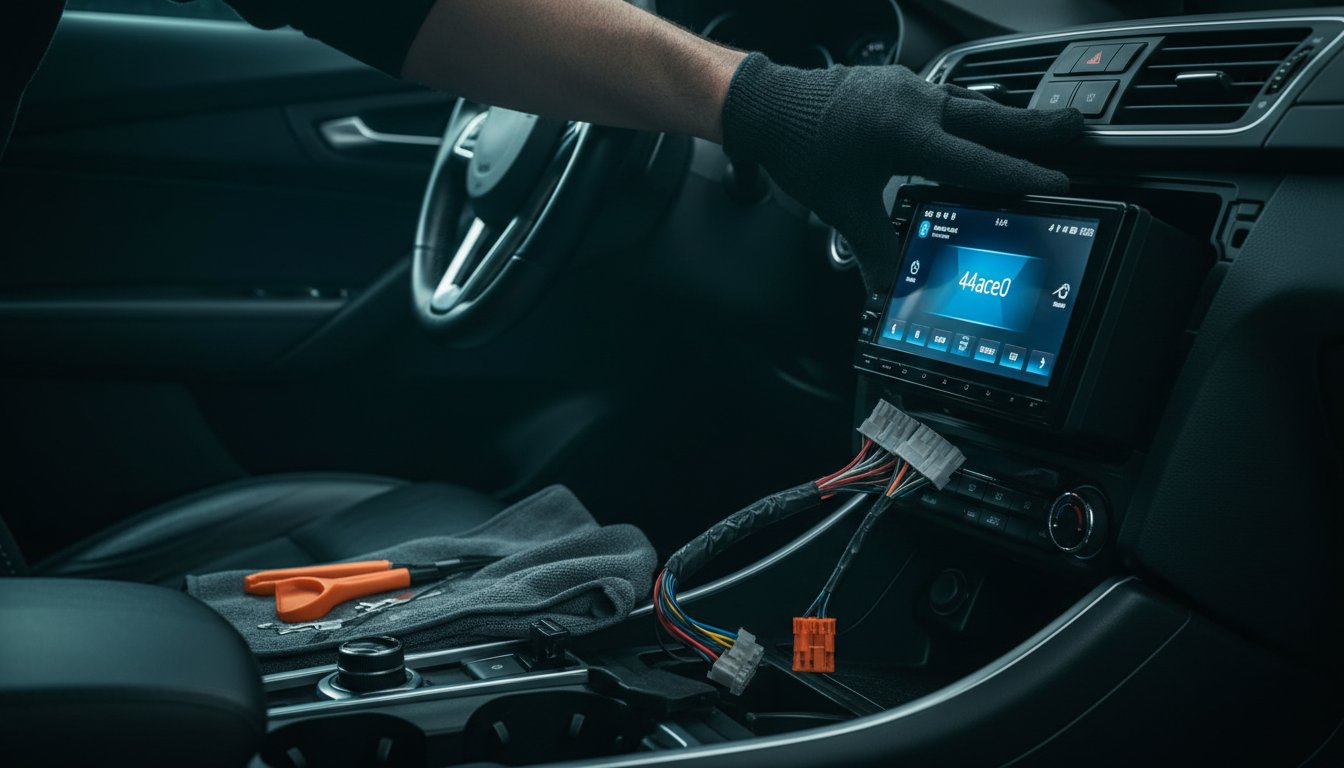
Safe removal begins with disconnecting the negative battery terminal using a 10mm spanner. This prevents accidental shorts that could blow fuses or damage your car's ECU during the process. For most UK-spec Ford, Vauxhall, and Audi models, you'll need brand-specific radio release keys. Insert these into the small slots on the face of the unit until they lock into place with a clear click. This how to install a car stereo UK guide prioritizes a damage-free removal to ensure you can return the car to stock when it's time to sell.
Once the keys are locked, pull the unit forward with steady, even pressure. Don't yank it. You need to reach behind the chassis to disconnect the main wiring loom and the FM aerial lead. Since UK digital radio regulations have shifted the market toward digital-ready hardware, you'll likely be replacing an older FM unit with a modern DAB+ system. Carefully depress the plastic tabs on the factory connectors to release them without snapping the housing. If the cables are tight, don't force them; look for cable ties that might be tethering the loom to the internal dashboard frame.
Step-by-Step Factory Radio Removal
Position your plastic pry tools into the narrow gaps between the head unit and the surrounding dash trim. Work your way around the perimeter to release the internal clips one by one. If your car uses a fascia that covers the mounting screws, look for removable panels around the heater controls or the gear stick gaiter. Always label any auxiliary connectors like the 12V socket or USB ports. This saves time when you're installing your new car DAB stereo and need to reconnect the secondary dash functions.
Dealing with Stubborn Dash Panels
Cold weather makes interior plastics brittle and prone to cracking. If you're working in temperatures below 10°C, run the car's heater for 15 minutes to soften the trim before prying. Check for hidden fasteners behind the glovebox or near the steering column. These often secure the larger dash sections that must be moved to access the stereo cage. Be extremely careful with the hazard light and airbag warning connectors. Disconnecting these while the battery is connected can trigger a permanent warning light on your dashboard. If you need the right tools for the job, check out our range of essential radio release keys and trim removal kits for a professional finish.
Wiring and Connectivity: ISO Leads and Steering Wheel Interfaces
Wiring an aftermarket head unit in the UK requires an ISO harness adapter to bridge the gap between your car's proprietary loom and the stereo's universal connection blocks. This how to install a car stereo UK guide focuses on the two-block ISO standard. Block A handles power, ground, and the ignition feed, while Block B contains the eight wires for your four speakers. For most vehicles manufactured after 2005, a simple plug-and-play adapter isn't enough because these cars use CAN-bus data signals rather than a traditional 12V ignition wire to tell the stereo to wake up. Using a CAN-bus-enabled harness ensures your stereo turns on and off with the key, preventing a flat battery.
Losing steering wheel button functionality is a common frustration, but it's easily solved with a Connects2 Steering Wheel Control Interface. This module translates your car's data signals into a language your new Pioneer or Alpine unit understands. You must match the interface to both your specific vehicle model and the brand of your new stereo using a dedicated patch lead. This setup maintains your ability to adjust volume and skip tracks without taking your hands off the wheel, ensuring a factory-standard user experience with thumping aftermarket power.
Retaining Factory Functions
The secret to keeping your dash controls lies in the patch lead. This small cable connects the 3.5mm jack or the single-wire remote input on the back of your new unit to the steering control interface. Whether you are installing a Sony, Kenwood, or Alpine system, the patch lead must be brand-specific. If your stereo stays on after you've pulled the key out, you've likely missed the 'Ignition Live' connection. In older UK cars, you may need to run a separate fused wire from the cigarette lighter or fuse box to the red wire on your stereo's harness to provide a switched 12V signal.
- Check the 3.5mm jack is pushed fully into the 'W/R' (Wired Remote) port.
- Ensure the 'System Remote Control' wire is properly crimped if using a wire-based input.
- Verify the CAN-bus box is clicking when the ignition is cycled.
Advanced Wiring: Amps and Subs
If you're upgrading to a full system, you'll need to route RCA cables from the pre-outs of your head unit to your car amplifiers. Always run your signal cables down the opposite side of the car from your main power wire to prevent electromagnetic interference. This is the only way to ensure crystal-clear sound without the dreaded engine whine. Your amplifier also needs a trigger signal. Connect the blue/white 'Remote Turn-On' wire from the head unit to the 'REM' terminal on your car subwoofers or amps to ensure they only draw power when the stereo is active.
Proper grounding is the most critical step for high-power systems. Find a solid, unpainted metal point on the vehicle chassis and secure your ground wire with a ring terminal. A poor ground is the number one cause of equipment failure and poor bass response. For the ultimate setup, we recommend using a 4-channel amplifier to drive your door speakers alongside a dedicated monoblock for your sub. This creates a massive, balanced soundstage that factory systems simply cannot replicate.
Installing the New Unit and DAB Antennas
Mounting your new head unit begins with securing the metal mounting cage into the vehicle-specific fascia kit. This how to install a car stereo UK guide ensures you achieve a flush, factory-style finish by bending the metal tabs on the cage outwards to lock it firmly against the fascia panel. Once the cage is rigid, you can integrate secondary components like DAB antennas and Bluetooth microphones before the final slide-in. This stage is critical for maintaining the high-performance aesthetics that Bass Junkies customers demand.
Digital radio performance depends entirely on the quality of your antenna installation. Most aftermarket car DAB stereos require an external glass-mount aerial to access the 56% share of digital listening currently enjoyed across the UK. Proper placement on the windscreen ensures you get the thumping, crystal-clear signal you expect from a premium system. Routing these cables early prevents the need to remove dash panels twice.
DAB Aerial Installation Tips
Clean the internal glass surface with an alcohol wipe to ensure a permanent adhesive bond for your glass-mount aerial. The small copper foil strap on the antenna must make direct contact with the vehicle's metal A-pillar to provide a proper ground plane. If you stick this strap over painted metal or plastic trim, your signal will be weak and prone to dropping out. Hide the thin aerial cable behind the A-pillar trim by tucking it carefully behind the rubber weather stripping. This keeps the cabin looking clean and professional while protecting the delicate wire from damage.
Final Assembly and Cable Management
Tidy your wiring loom using cable ties to prevent annoying rattles behind the dash once the car is in motion. Modern double DIN units with multiple RCA outputs and heavy harnesses require careful positioning to avoid snagging or crushing wires. Route your Bluetooth microphone cable behind the dashboard and up the A-pillar to the sun visor for optimal voice clarity. If your unit features rear USB ports, run the fly-leads into the glovebox or center console to provide a clean connection point for Apple CarPlay and Android Auto.
Always perform a 'pre-fit' test by powering the unit on and checking all functions before clicking the fascia into its final position. Verify the steering wheel controls, DAB reception, and smartphone connectivity work perfectly. Once confirmed, slide the unit into the cage until the side clips lock with a solid click. This results in a clean, flush-mounted finish that looks like a factory-fitted premium upgrade. Ready to transform your dashboard? Browse our massive range of Pioneer and Alpine touchscreen head units for the ultimate in-car experience.
Professional Installation vs. DIY: When to Call the Experts
Professional installation is necessary when a vehicle's factory infotainment system is deeply integrated with climate controls, lighting, or vehicle settings that require ECU coding. While this how to install a car stereo UK guide provides a roadmap for hardware swaps, modern cars with MOST fibre-optic networks require specialist bypass modules and diagnostic programming. Professional installers offer precision DSP tuning and time-alignment settings that a standard DIY setup cannot replicate. With UK installation costs for a head unit averaging between £30 and £150 as of May 2026, professional intervention provides a safety net against damaging expensive CAN-bus components. Choosing an expert ensures your high-performance system delivers crystal-clear audio without compromising your vehicle's complex electrical architecture.
DIY enthusiasts often struggle with premium European vehicles where the audio signal travels through fibre-optic loops rather than copper wire. In these scenarios, a simple ISO adapter won't work. You'll need a MOST interface to convert digital signals into analogue RCA outputs for your 4-channel amplifier. If you're unsure about your vehicle's wiring topology, professional advice prevents the risk of a total system blackout. Our team understands the intricate details of impedance and signal flow, ensuring every component in your signal chain performs at its peak.
The Bassjunkies Advantage
When you choose Bass Junkies, you're accessing the UK's No. 1 range of car stereos from industry leaders like Pioneer, Alpine, and Kenwood. We don't just sell boxes; we provide a technical partnership. Our professional workshop services handle custom dash modifications that go beyond standard fascia kits. This includes bespoke fabrication for 2-DIN fitments in classic cars or complex modern dashboards. Every professional installation comes with a comprehensive guarantee on both the hardware and the labour, giving you total peace of mind while you enjoy thumping bass.
Upgrading Beyond the Head Unit
A high-performance head unit is only the beginning of your audio journey. To truly transform your cabin, you should consider upgrading to high-fidelity car speakers from brands like Focal or JL Audio. Factory speakers are typically made from cheap paper cones that distort at high volumes. Replacing them with component sets featuring external crossovers and silk-dome tweeters provides the ultimate soundstage. This ensures your mid-range is punchy and your highs are crystal-clear.
Don't overlook the importance of sound deadening as the essential foundation for your system. Applying Dynamat Xtreme to your door skins reduces road noise and prevents panel resonance, effectively turning your car door into a sealed speaker enclosure. This simple step can increase your mid-bass response by up to 3dB without adding more power. Ready to go all the way? Check out our ultimate sound system building guide to learn how to integrate powered subwoofers and multi-channel amplifiers for a massive, competition-grade experience.
Upgrade Your Dashboard for Ultimate Performance
You now have the technical roadmap to ditch that weak factory sound and install a high-performance head unit. This how to install a car stereo UK guide has shown that the right vehicle-specific fascia and ISO harness are critical for a flush, professional finish. By integrating a Connects2 interface and mounting a dedicated DAB+ antenna, you ensure your system retains full steering wheel functionality and delivers crystal-clear digital reception across the UK. These steps are the foundation for any high-octane audio build.
Since 1995, Bass Junkies has reigned as the UK's No. 1 specialist, providing the expert advice and massive stock levels that enthusiasts demand. We carry the latest 2-DIN fitments from Pioneer, Alpine, and Kenwood to ensure your upgrade is thumping and powerful. Shop our massive range of Car Stereos and UK Fitting Kits to get the gear you need today. Stop settling for mediocre factory audio; it's time to build a system that hits as hard as your favourite tracks. You've got the knowledge, now get the gear and start your install.
Frequently Asked Questions
Do I need a new wiring harness for an aftermarket car stereo?
Yes, an ISO wiring harness adapter is essential to connect your vehicle's proprietary loom to the universal plug on an aftermarket unit. Without this, you would have to cut factory wires, which ruins resale value and risks electrical shorts. For cars built after 2005, you specifically need a CAN-bus interface to handle data-driven ignition signals and ensure your unit turns off with the key.
Will I lose my steering wheel controls if I change my car radio?
You will only lose steering wheel functionality if you fail to install a vehicle-specific interface like a Connects2 module. These interfaces translate your car's button signals into commands your new Pioneer or Alpine stereo can execute. Always ensure you purchase the correct patch lead for your specific stereo brand to maintain full control and a factory-standard user experience.
What is the difference between Single DIN and Double DIN?
Single DIN units measure 2 inches in height, while Double DIN units are 4 inches tall. Most modern touchscreens are Double DIN to accommodate massive 7-inch displays and seamless smartphone integration. This how to install a car stereo UK guide recommends checking your dash aperture before buying to ensure you have the right fascia kit for your chosen size.
How do I install a DAB antenna for my new car stereo?
Stick the glass-mount DAB antenna to the top corner of your windscreen after cleaning the surface with an alcohol wipe. The copper foil strip must touch the metal of the A-pillar to provide a solid ground plane for a crystal-clear digital signal. Route the cable behind the trim to keep the install looking professional and prevent the wire from being snagged or damaged.
Can I install a car stereo myself without any experience?
You can perform a basic swap if you follow a how to install a car stereo UK guide and use the correct non-marring tools. However, modern dashboards are fragile and complex. If your car has fibre-optic wiring or integrated climate controls, paying the average UK professional fee of £30 to £150 is a smart investment to avoid permanent dash damage.
Why does my new car stereo lose its memory every time I turn off the car?
Your stereo loses its memory because the permanent live and ignition live wires are reversed in the harness. On most ISO adapters, you simply need to swap the red and yellow bullet connectors. This ensures the yellow wire provides constant power to save your radio presets and clock settings even when the ignition is switched off.
Do I need a fascia kit for every car stereo installation?
A fascia kit is required for any vehicle that does not have a standard rectangular 1-DIN or 2-DIN opening. Most UK manufacturers use curved or oversized factory units that leave massive gaps when removed. A high-quality fascia panel fills these gaps to provide a flush, factory-standard appearance for your new thumping audio hardware.
How long does it take to install a car stereo in the UK?
A standard head unit installation typically takes between 45 minutes and 2 hours for a hobbyist. If you are routing a DAB antenna, Bluetooth microphone, and USB fly-leads, the process will take closer to 3 hours. Complex systems involving steering wheel interfaces or CAN-bus integration require more time for careful cable management to avoid rattles behind the dash.